3 Best Ways to Record Gameplay on PC For Free (No Watermark)

Summary :
How to record gameplay on your Windows PC without watermark? Read this post to get 3 free ways, as well as some tips on optimizing video recording settings for the best game recording experience.
Content Table
Gaming has been something extremely popular of late, and that is perhaps why gamers have been looking for ways to record their screens when playing the game. There are times when you would be looking to showcase or share your gaming progress with your followers and friends. That is where a tool to record gameplay on PC becomes quite essential.
While we have a host of free tools that can help you record gameplay on your PC, most of them leave a watermark which can be annoying. This problem prompted us to look for the best tools to record gameplay on a PC with no watermark.
Method 1 – Record GamePlay using Windows Default Game Recorder.
The default Windows Game recorder was previously named Windows 10 Game DVR. In the later versions of Windows 10 and above, it was renamed to Xbox Game Bar. It records your GamePlay and can also help you record other activities on your screen. In essence, it is a built-in screen recorder on Windows PC and lets you record your GamePlay with no watermark. It works with almost all the games you might have downloaded from the game download websites.
Best Features:
- Comes built-in with all Windows 10 and 11 systems.
- Completely free to use
- You do not need to create a special account
- Basically targeted the gamers
Pros
- It can record PC and Xbox games
- Free for lifetime
- No downloads of any sort required
Cons
- Works only on Windows
How to Use Xbox Game Bar?
It is quite simple and easy to use the Xbox Game bar on your PC.
Step 1: Launch your game and begin to play
Simply launch your game and be ready to play your game. This should require no explanation.
Step 2: Launch Xbox Gamebar
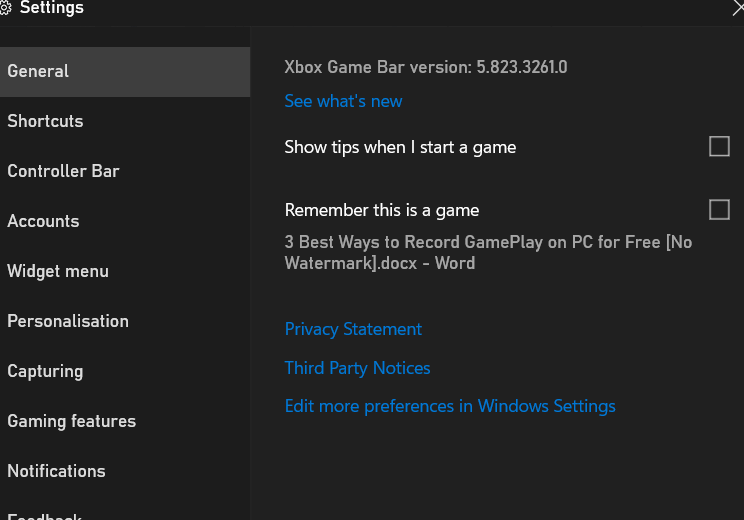
Press the key combinations Win+G to launch the Xbox Game bar. This will activate the Xbox Game bar. The app can smartly detect the game that you are playing.

Xbox Game Bar
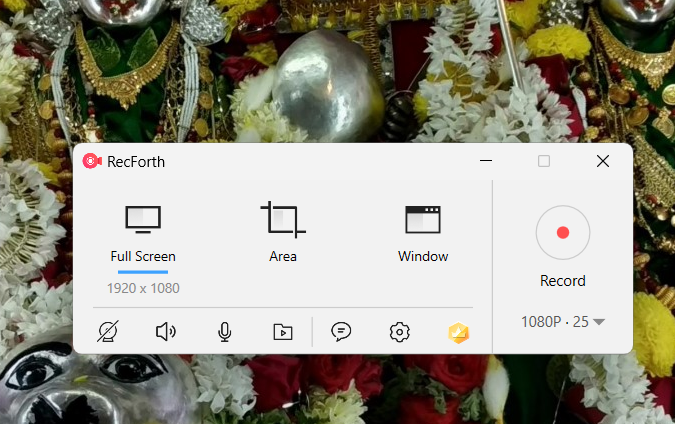
Step 3: Adjust the settings
Adjust the audio settings on the app and hit the Record button to st recording your screen. You can record your gameplay with no time limit or watermark.
Settings Xbox Game Bar
The tool is quite simple and easy to use. The major issue with the tool lies in the fact that it cannot record only a part of the screen or a specific program or its content.
Method 2 – How to Record GamePlay using OBS Studio for PC?
OBS Studio is yet another popular and great means to record GamePlay on your PC without any watermark. The software has been used by gamers globally, but it may be a little annoying and a little difficult to use it.
OBS (Open Broadcaster Software) Studio is free, open-source software, and it can be a great means to help you record gameplay footage, webcam footage, and more. The open-source application also supports cross-platform functionality, thereby making it a good choice for use across any operating system that you would prefer.
Features
- Can output video in multiple formats
- Variable bit rate and encoder options
- Input options from multiple sources.
Pros
- It is highly customizable
- It can record high-quality video at 60 fps and 1080p resolution
- It does not have any limitation on the video length.
- It offers you support for Windows, Mac, and Linux operating systems
Cons
- It can be a little confusing to the new users
- Limited video editing features
- Installation can be a little confusing
How to use OBS Studio for recording GamePlay on a PC?
It may be a little difficult to explain the steps involved in how to use OBS Studio for recording GamePlay. The tool in itself is a little complicated to use.
Step 1 – Launch OBS Studio
Launch OBS Studio and press the + icon next to the Sources option. This is used for adding the new source. Choose the option Game Capture from the context menu. Name the source as per your preferences.

OBS – Game Capture
Step 2 – Start Recording
Click on the game that you want to record from the Mode drop-down arrow. Click on OK to begin recording your screen.

OBS – Choose Capture
You can either record the screen or stream it on Discord. Click Start Recording on the Controls section to begin recording your screen.

OBS – Start Recording
Method 3 – Record GamePlay on Windows 10 using Recforth
RecForth is one of the most popular screen recorder tools that has become a hot favorite with gamers really faster. It is a robust screen recorder tool with an intuitive interface on Windows 10 and 11. The way it can be customized exactly in the manner that you want it to makes it a formidable pick. It can help you record the entire screen, a separate window, or even a custom area on the screen.
Features
- Efficient game recording at 120 FPS without any lag.
- High-quality screen recording
- It also supports webcam recording along with screen recording
- You can opt for both system audio and external audio.
Pros
- 4K and higher resolutions supported
- Unlimited recording capabilities
- Customized recording with hotkeys
Cons
- Support for Windows 10 and 11 only
- No editing options are available, but you can use editing tools for your gameplay videos
How to use RecForth to record GamePlay on a PC?
Step 1: Download RecForth for free
RecForth is available only on Microsoft Store. Download and install it from your Microsoft Store. Once installed, launch it on your device.
RecForth – Main Interface
You can choose from among three modes viz full screen, custom area, and window.
Step 2: Set up the screen for recording
Launch the game that you wish to record the gameplay for. Select the area that you are looking to record. You may also choose to record the audio as per your preferences.

Game Recording Setting – RecForth
You can also pick the other settings by clicking on the Settings option on the toolbar. It lets you undertake advanced settings such as FPS, Resolution, etc.
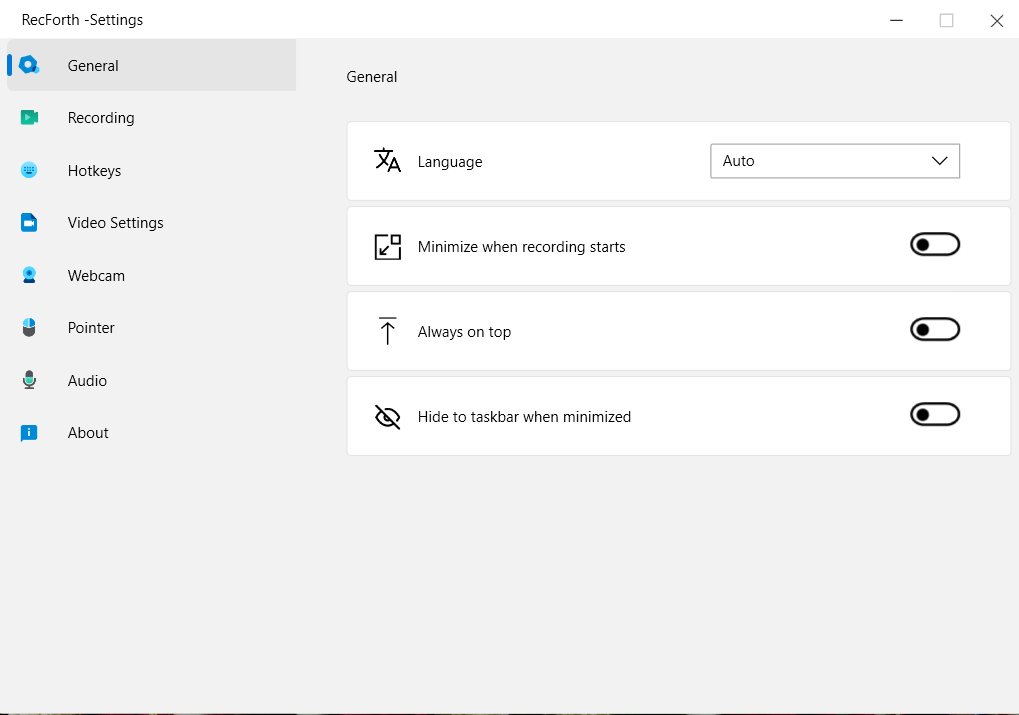
Additional Setting – RecForth
Step 3 – Start recording your gameplay
Once you are ready, hit the red RECORD icon to begin recording your screen. If you want to pause, resume or stop the recording, you can click the corresponding buttons on the floating panel.

Start Recording – RecForth
Once you stop the recording, it will be automatically saved on your device. You can then rename it or share it as per your choice.

Recorded Videos – RecForth
Things to Keep In Mind When Recording Gameplay on PC
It has become really easy and simple to record gameplay on a PC. With a huge number of tools that help you record your game progress with ease, the concept has become quite accessible and easy to go with.
However, there are a few parameters that you need to pay special attention to when recording the gameplay on your device. This will make sure that you will get access to a great degree of efficiency in saving your favorite videos. Let us check out a few specific parameters to help you improve the effective gameplay on PC.
1. Video recording parameters
The video resolution should be as high as possible. We would recommend a resolution of at least 1080p. Under ideal conditions, we would recommend using the video resolution as that on the original game.
2. Frame rate
The frame rate should also be a prime factor that you would need to pay enough attention to. The higher frame rate will ensure better video quality. Anything above 30 should be quite good, while we recommend 60 fps to be a good option. If the game is full of faster movements, a higher resolution would be a good option.
3. System resources
Running the game and the video recording simultaneously can put a lot of load on your system resources. It would be advisable to close all the applications that you do not use to free up the system resources.
4. In-game graphics settings
Making improvements to the in-game settings can be yet another prime factor that you may need to focus on for an effective game recording. If your game has the highest settings, using the same may be more practical. However, it is equally important to check if your PC supports it or not.
The Closing Thoughts
Well, recording gameplay on a PC with no watermark is much easy if you are able to pick the right tool for the purpose. We would assume that the list of apps that we have outlined here should work efficiently in helping you record your gameplay with no hassles.
RecForth, in our view, is a full-fledged and effective tool that brings a lot of essence to your gaming and gameplay recording. When compared to the complex functionality of OBS Studio or the lack of a few features on the Xbox Game bar, RecForth doubles up with a host of best features and benefits.
FAQs
1. Is there any gameplay recorder for low-end Windows PC?
Yes, you have several options that can work efficiently with low-end PCs. Xbox Game Bar should be the best built-in option for the purpose. RecForth is another capable tool that can help you enjoy a powerful gameplay recording on your PC.
2. How to capture gameplay on pc without losing FPS?
If you want to record gameplay without losing the FPS, it is advisable to use the right recording tool for the purpose. The right tool used for recording gameplay without losing FPS is to use the best recording software. RecFoth should be the best pick for the purpose. It lets you adjust the recording settings on the tool to achieve better recording capabilities.
3. How to capture gameplay with a webcam on a Windows computer?
Most screen recorder tools support recording the gameplay with a webcam on a Windows computer. You just need to go into the settings app for your chosen screen recorder and select the appropriate source. In this case, you are expected to select the webcam as the source for recording your screen.