OpenShot Review: Make Learning Video Editing Fast and Fun [2023 Updated]
OpenShot is a piece of practical and easy-to-use video editing software. This article will take you to step by step through OpenShot from price, interface, features, etc.
openshot-review
OpenShot, founded in 2008, is a piece of video editing software that aims to provide the world with high-quality video editing and animation solutions. Although OpenShot is a free program, it can not only provide users with a good experience but also meet the daily needs of most people.OpenShot is a high-traffic desktop video editing program. It allows you to preview, zoom, trim, and synthesize videos in real-time, which can help users, especially novice editors, find some perfect moments better. At the same time, it allows you to cover pictures, decode videos, zoom digitally, mix audio, and make special effects. Among them, the 3D animation title and effect built into the software are very powerful, which can make your video instantly catch the audience’s eye.
More Free Video Editors: InShot Review, Lightworks Review, VideoPad Review
Pros and Cons
OpenShot can be regarded as a very potential video editing program for computer desktops. Of course, for any software, the advantages and disadvantages are parallel. However, every update will be improved according to the shortcomings of the previous generation put forward by customers to enhance customers’ experience.
PROS
- The step-by-step instruction schematic is very detailed and perfect for novice editors to get started.
- Allows adding a large number of layers to meet the required amount of work.
- Supports 360p to 4k HD video output, giving your videos a distinctive quality.
- The drag-and-drop feature makes video editing fast and saves a lot of time effectively.
- Multiple language versions allow you to understand the built-in ribbon options without any trouble.
- Comes with more than fifty types of effects to easily meet your daily needs.
- Completely free and no annoying watermarks to affect the viewing experience.
CONS
- The download package is too large, so it takes a long time to download and may even take several hours.
- If the material is too large during use, it may cause a crash.
- Sometimes the operation execution is delayed, which affects the editing process a lot.
- Lacks some very basic features.
Pricing
OpenShot is a piece of completely free video editing software, and you can start your video editing journey through it without spending any money. Of course, when you enter the official website of OpenShot (https://www.openshot.org/), you will find a donation column on the front page. You can support it at any time. You can choose to pay a monthly fixed donation of $2, $5, $10, $20, or $50 for it. You can also set any amount to donate. Therefore, it is also a 100% voluntary video editing program.
After you make a donation, the website will display your name on the thank-you page.
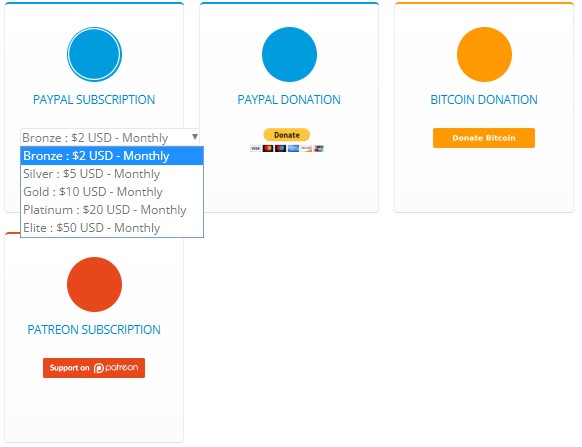
OpenShot Pricing
Main Interface
The main interface of OpenShot is very concise. There are only three panels: Project Files, Video Preview, and Timeline Panel. Its main color is black, so it looks very simple and smooth. The upper function key is very practical. As long as you can use them well, your editing efficiency will be greatly improved. It is worth mentioning here that there are two main practical functions.
The first is a shortcut key setting: Edit-Preferences-Keyboard, which covers almost all the steps needed in the video editing flow. You can know the default shortcut usage by yourself or change the settings according to your memory mode. The second is view mode transformation: View-Views (simple view and advanced view). Openshot allows you to change the view of the main interface according to your editing needs and habits for convenience.
OpenShot covers nearly 70 languages around the world.
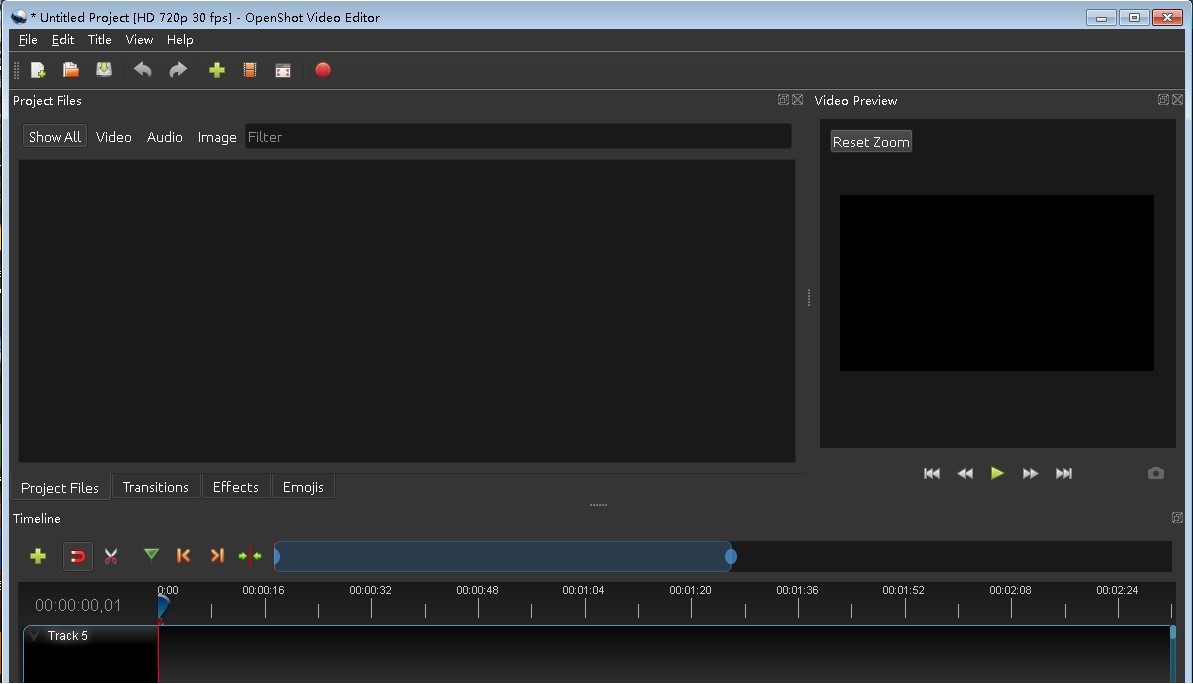
OpenShot Main Interface
Project Files
The first step to start video editing is to import the material you want to process, and all the applications in OpenShot can be added directly by dragging the mouse. So the most convenient way to add material is to drag the files from your computer directly to the media interface. This operation often takes only a few seconds and is very fast. You can also add clips by right-clicking in the media box or by clicking File-Import Files.
After adding, we can find that OpenShot automatically classifies all the materials into three types: Video, Audio, and Image. When you import too many kinds of materials, you can search in different classification interfaces for convenience. At the same time, in order to facilitate users’ screening, OpenShot also set up a search box here. You only need to enter the file name to directly filter out the corresponding material. If you think the Thumbnail View looks confusing, you can click the right mouse button to set the material display view and turn it into Details View. This can be said to be very humane. At the same time, all panel borders can be directly dragged to adjust the size for easy operation.
Detailed material page display diagram.
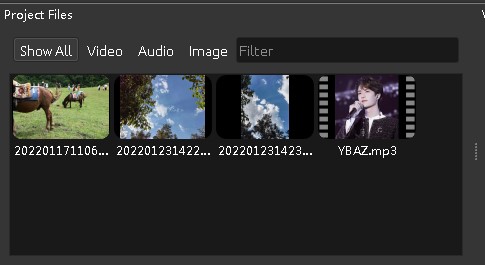
OpenShot Project Files
Transitions, Effects, and Emojis are listed at the bottom of the material panel. Click on different classification boxes, and all the effects or stickers will be presented in the material panel. There are so many kinds of special effects or stickers built-in OpenShot that you can always find the one you want here. Of course, this is also the root cause that it takes time to download.
Video Preview
Video Preview, as its name implies, is the display window of video, image, or audio. Just click on the material on the timeline, and Video Preview will show you. Here, the main operations are to show pictures or sounds, preview special effects, and adjust pictures. The arrow below has three main functions: play or pause the video (audio), fast forward or backward, and adjust to the control of the beginning or end. The camera-like button on the right is a screenshot button. You can save screenshots of any frame.
If you look closely, you will find that the picture is framed by a blue square with a circle in the middle. By changing the size of this box, you can directly determine the size of the image. Place the mouse on the border and change the shape of the cursor when it becomes two vertical lines. When the cursor turns into a circle, it can be rotated. When the image is rotated, the center point of rotation can be changed by moving the center circle.
Slide the mouse wheel to adjust the view display size of the whole preview window.
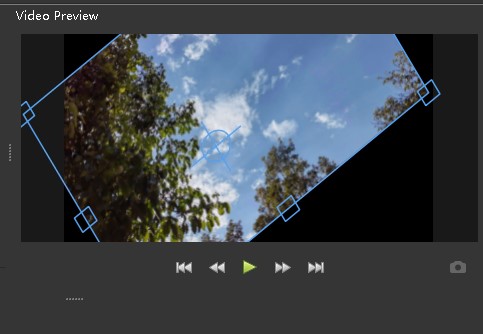
OpenShot Video Preview
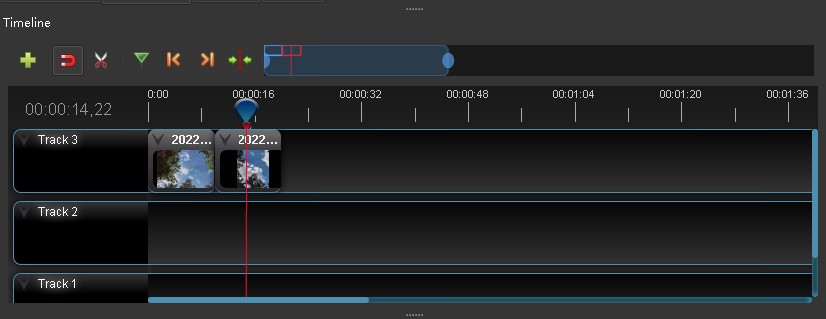
Timeline Panel
The infinite track setting of OpenShot is very attractive. Timeline is one of the most important aspects of video editing. This panel will be the most frequently used in the whole video editing process, so being able to flexibly use the functions of this panel will greatly improve your editing efficiency. Below is a detailed introduction of the specific functions of the timeline panel:
- Add marker: The green funnel-shaped marker allows you to mark any position of the video. It allows you to quickly find the corresponding position when working with long videos.
- Key point positioning: The two orange arrows allow you to easily locate key points.
- Slider: The blue slider above allows you to quickly navigate the entire timeline, or adjust the time gap above the timeline for precise positioning or rough editing.
- Track editing: Click the mouse mail to rename, lock, or delete tracks.
- Separate audio: When you add a video clip, you can choose to separate the audio from the video and put it on a different timeline for separate editing.
- Properties: Click the Properties button to see all the parameters of the clip.
- Audio display graph: When you add an audio clip to the timeline, you can choose to display it as a thumbnail or a waveform graph.
Video, audio, and pictures can be put on the same time track.
OpenShot Timeline Panel
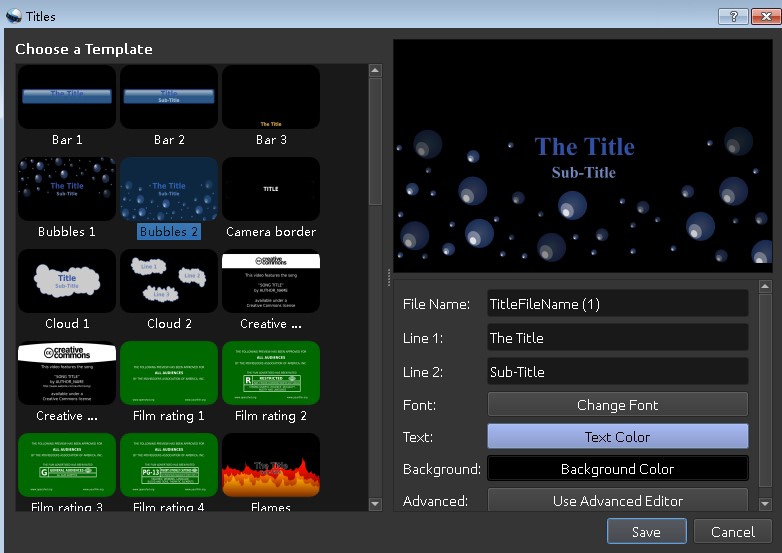
Titles
Adding titles is a special feature of OpenShot. Click the Title drop-down box to add and set the title. You can write the title directly in the pop-up box. If you need to add too many words, you can record the text first, add it to the material column as a file, and then add the file directly. There are hundreds of special effects of titles, and you can choose them at will. On the right side of the pop-up window, you can set the color, font, and background of the text. However, it is worth noting that if you want to add animation titles, the Blender should be installed on your device first (http://www.blender.org), and the Blender version must be version 2.8 or above. After the installation, you can continue to add animation titles normally, otherwise, you will be blocked in this step.
Animation titles are more attractive than ordinary titles, so it is highly recommended to install a Blender to obtain the right to use animation titles.
OpenShot Title
Effects and Transitions
Special effects and transitions in the video can greatly improve the perception and texture of the video. OpenShot provides a large number of video effects and transition effects for video editors. How do apply these special effects to the video clips?
First, special Effects. Click Effects on the media page to browse all the special effects. Find a special effect you want to add, select it with the mouse, then hold down the left mouse button and drag it to the corresponding clip on the timeline. There are two main ways to check whether the special effects are successfully added: First, drag the timeline cursor to browse and verify in the preview window. Second, look directly at whether the initial letter of the special effect is displayed above the corresponding clip.
Effect adding details display diagram.
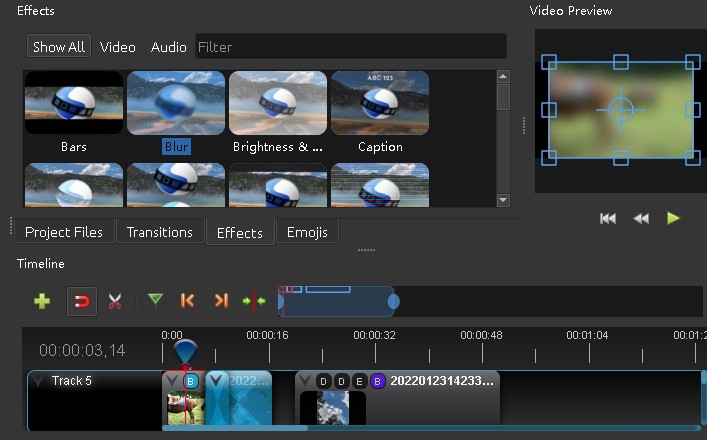
OpenShot Effects
Secondly, the transition effect is mainly used for the transition between two clips. Drag the two clips on the timeline to the overlapping part. Similarly, drag the effect of Transition directly to the overlapping part to apply successfully. Of course, you can delete these special effects at any time, just click the right mouse button to remove them.
Save and Export
In any operation, whether it is video editing or document writing, it is necessary to develop a good habit, that is, save it at any time to prevent all previous efforts from being wasted due to emergencies. OpenShot allows you to save in real-time in two ways. The first is to click Save Project in the File drop-down box to save (shortcut Ctrl+S). The second is to set the auto-save items in the edit-preferences. OpenShot allows you to set the auto-save program (Ctrl+Shift+P): Edit-Preferences-Autosave. This can effectively prevent file loss.
OpenShot allows you to set the time interval, History Limit, and Recovery Limit for automatic saving separately.
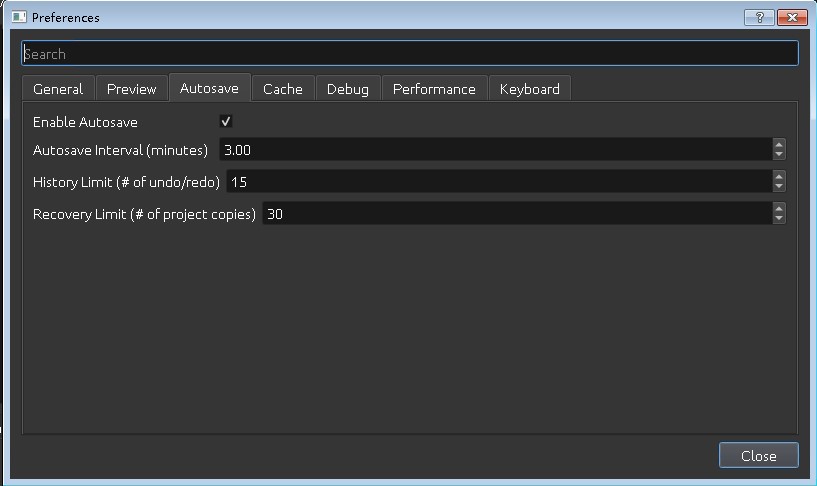
OpenShot Save
When you finish exporting your work, you can directly click File-Export Project-Export Video (Ctrl+E) to enter the export page. In the Simple option bar, you can set the profile, target video profile, and quality. When you come to the Advance option bar, OpenShot allows you to export audio or video separately. At the same time, you can also export the corresponding clips.
According to the progress bar below, you can learn about the video export process.
Device Support
OpenShot is a piece of high-quality cross-platform video editing software, which can be applied to Linux, Mac, and Windows simultaneously.
Verdict
OpenShot is a very safe open-source video editing program, so you can download and use it with confidence. However, please be sure to click the download link on the official website, and do not download directly in the browser. In OpenShot, we can learn by following its navigation. At the same time, you can also look for related tutorials on the Internet for in-depth understanding.
If you are a short video enthusiast or amateur video editor, OpenShot will be a good choice. It not only allows you to clip size, zoom, trim, capture, rotate, and cut videos, but also supports many video, audio, or image formats based on FFmpeg.
When you finish your work, you can share it with various social platforms. And, to show your uniqueness, OpenShot also supports creating watermarks freely. You can create a unique watermark for your finished video by your imagination, so as to improve it to a higher level.

Karen is a professional writer with a background in column writing who enjoys resolving complex topics and explaining them in interesting ways.
