VideoPad Review: Practical but Free Video Editing Software
VideoPad is a video editing program that can provide you with many basic functions to meet your daily needs. This article is a comprehensive comment on VideoPad, including pricing, advantages and disadvantages, menu functions, and editing features.
Videopad Review
As a piece of very practical video editing software, VideoPad is a video editing application developed by NCH software (the developer) for the home and professional markets, and known as a great alternative to iMovie on Windows PC. Because of the support of the VirtualDub plug-in, users can freely access other tools and effects from third-party sources. It makes your operation simple and efficient.
VideoPad is a free video editing program. But compared with other video editing software on the market, there are no annoying watermarks when you export your video. This greatly improves the viewer’s viewing experience. Therefore, it can stand out from lots of video editing software.
VideoPad Desktop Icon
VideoPad is very suitable for novice editors to learn. Its simple interface makes the operation easier. At the same time, it can not only edit video but also allow you to edit audio or images. You can set the transition effect, change the background music and add the title effect to your file. In addition, VideoPad also supports many export formats like DVD, CD, avi, wmv, etc.
More Latest Reviews: Adobe Premiere Elements Review, Vegas Pro Review, Adobe After Effects Review
Pros and Cons
The simple operation interface of the VideoPad makes it very easy for beginners to learn because you don’t need to spend too much time understanding those buttons. You can use it to make some eye-catching videos and make your life more refined.
Pros:
PROS
- Simple interface, simple functions, and easy learning.
- It takes up very little computer memory and downloads quickly.
- Support 360-degree video creation.
- You can record your unique narration.
- Allow burning to DVD and watching on TV.
- No watermark.
CONS
- The free version will have annoying pop-up windows.
- Relatively simple basic functions may not meet the needs of professional video editors.
- Automatically converting speech into text is prone to errors.
Pricing
VideoPad is a piece of free software. You can download it directly from the official website (https://www.nchsoftware.com/videopad/index.html). Of course, according to your needs, VideoPad has also launched two paid versions and three different paid forms -Master’s Edition and Home Edition.
Master’s Edition: $49.99 (Or you can choose to pay quarterly at $3.88 per month)
Home Edition: $24.99
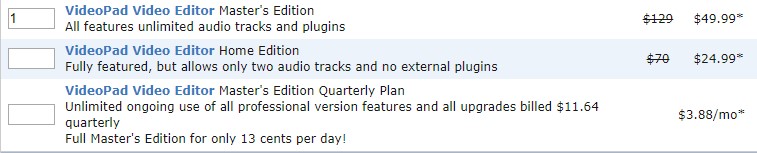
Price List of VideoPad
Main Interface
Double-click the VideoPad icon to enter the main interface. First, a pop-up window will appear in front of you, including creating or opening projects, Video Wizards, and learning guides. This greatly helps you to better understand the software and master it quickly.
When you close this pop-up window, VideoPad marks some novice guides for you intimately. At this time, you will feel that a teacher is teaching you how to use this software. This will undoubtedly shorten your study time.
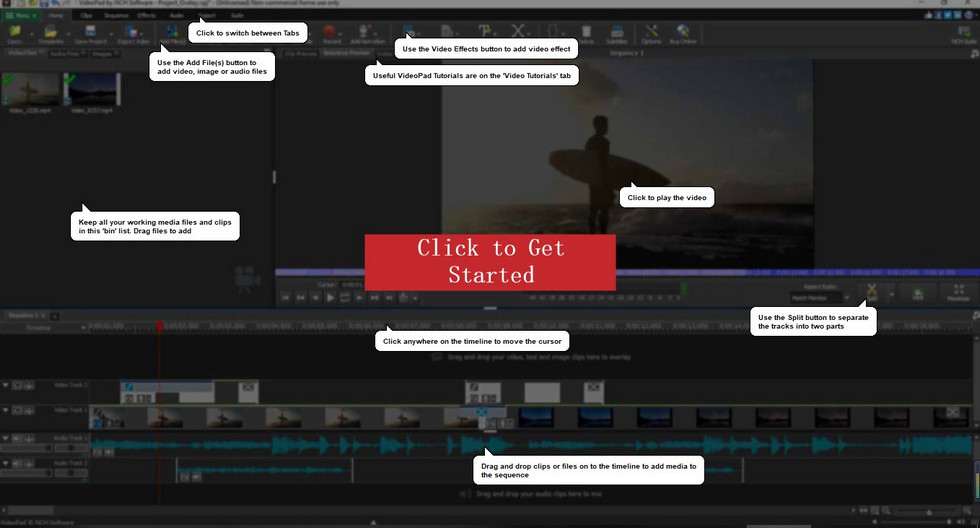
VideoPad Operation Guide
The interface of the VideoPad is very simple. It is mainly divided into four areas: menu area, media pool, preview window, and timeline panel.
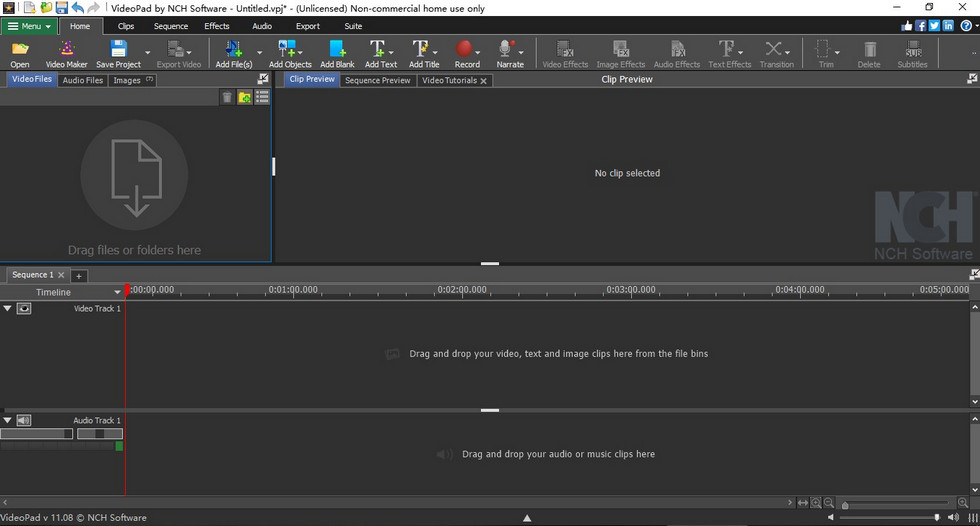
Main Interface Display Diagram
Menu Area
You can find all the functions of VideoPad in the menu area. First of all, Menu, click on this drop-down box and you will find that all the function buttons are covered. So this button is also regarded as a summary button. Then the Home button, in this option box, you can see all the functions you need to edit the video. Adding files, video effects, audio effects, transition saving items, and exporting video are the most commonly used operation buttons.
Clips bar is specially used for editing every video clip, which is suitable for fine cutting. So if you need simple basic editing, you may not need these functions. The Sequence tab is mainly used for fine-tuning fragments. When you enter this mode, you will find that the timeline will be wider than before. This will make it easier for you to add video overlay or adjust the appearance of clips. If you have audio in your video, you need to move your eyes to the Audio button.
This tab is similar to the Sequence tab previously. The Effect menu bar contains all the special effects you might use, which will make your video more advanced. The Export tab allows you to easily export various formats or share them with your social platform after editing the video. The last Suite bar provides you with other tools and software for video creation. The software is displayed one by one and can be downloaded directly to your device by clicking the icon.
Media Pool
The media pool of the VideoPad is used to upload and save the materials. There are two ways to upload the materials. The first one is to drag and drop directly. The second is to click Add File(s), select the file to be added, and finally click Open. When you upload your material, you will find that the media pool will automatically classify these materials for three types-video files, audio files, and images.
At the same time, for the convenience of operation, you can also click the arrow icon in the upper right corner to realize dual-screen operation. If you want to restore it, just click the cross in the upper right corner.
You can move this floating window at will.
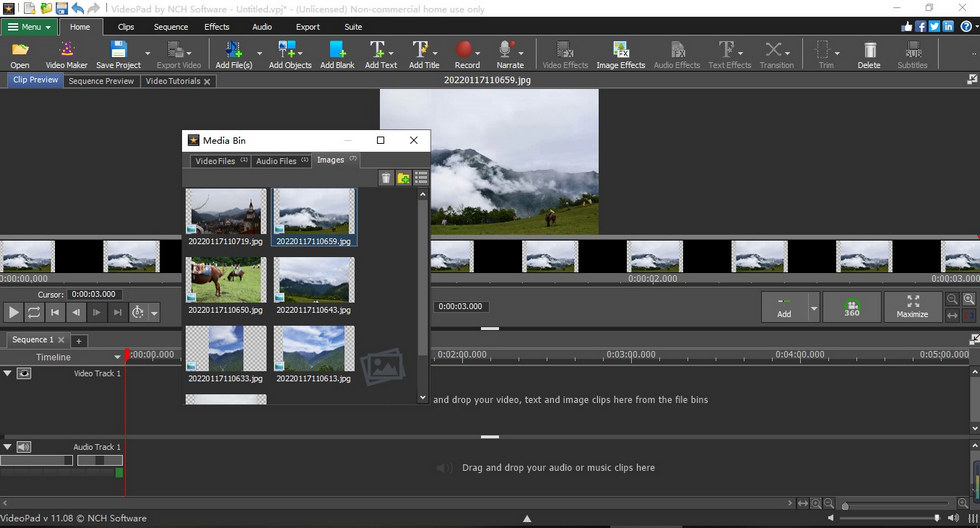
Videopad Media Pool
Preview Window
When you double-click the material, it will be displayed in the preview window. Here, you can change the start position and end position of the video, split the clips, unlink the video or audio, adjust the video speed, and so on.
Like media pools, preview windows can be divided into Clip Preview and Sequence Preview. And it can also realize dual-screen operation, which will make your editing more convenient. Reasonable use of the small buttons in the preview panel allows you to quickly edit directly through the keyboard.
For beginners, the Video Tutorials will also be shown here.
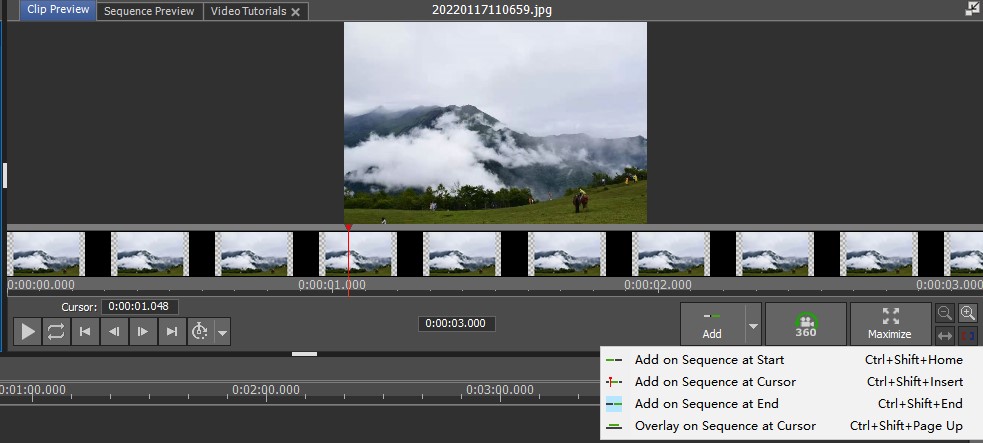
Videopad Preview Window
Timeline Panel
The timeline panel of VideoPad is divided into two parts: video timeline and audio timeline. There are two presentation modes available here-Timeline mode and Storyboard mode. The timeline mode mainly shows the duration of each segment, while the storyboard mode shows the relationship between each segment. Choosing the appropriate timeline display mode can improve your subsequent operation efficiency.
The timeline can be adjusted appropriately by the mouse.

Videopad Timeline Panel
Transition
Each video contains many different clips, and the special effects used between these clips are called transitions. The addition of transitions can make the connection between video clips more smooth and natural. Adding transitions under the storyboard model is very convenient. Just click the connecting symbol between each video clip, and all kinds of built-in transition effects will be displayed.
You can preview one of the transition effects directly by placing the mouse over it. You can choose the corresponding transition according to your needs. For example, you can choose stereo conversion from 2D to 3D, smooth from one scene to the next, or zoom to switch clips.
You can customize the transition time.
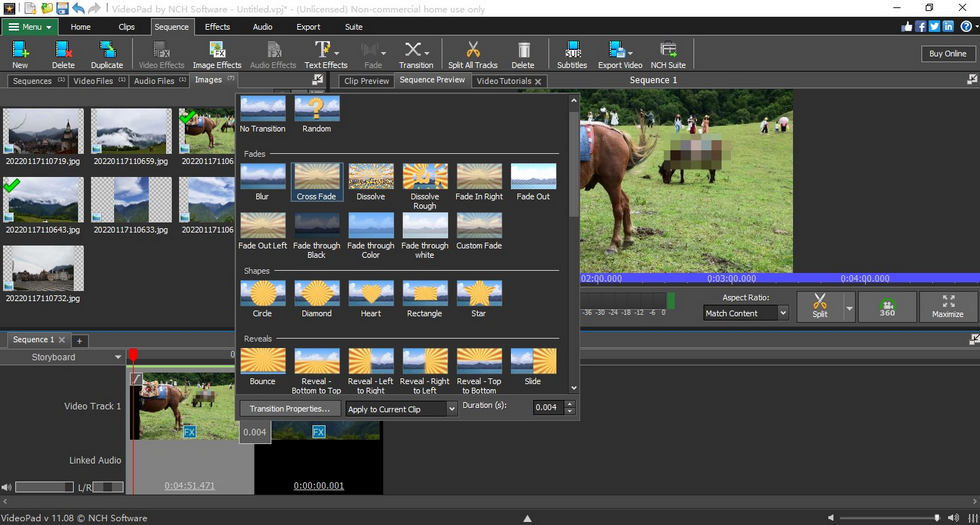
Videopad Transition
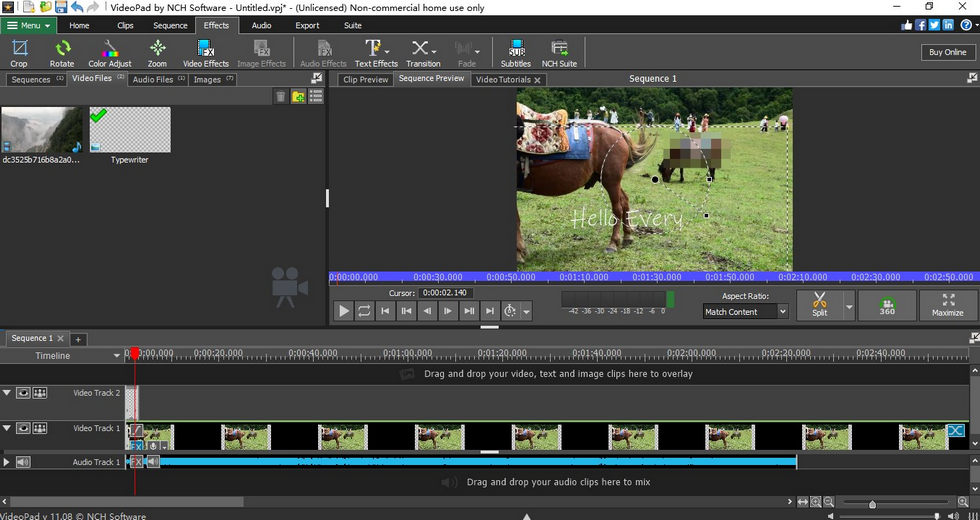
Video Masking
Almost all video editing software has a special effect called Blur, which can make your video blurry. But what if you want to mask a small area of the video? First, use the mouse to select the timeline area. Then click FX at the bottom left, and then an effect floating window will pop up. Select Censor in Filters. At this time, you will find a box in the preview interface, and you can directly resize it with the mouse. There are many options in the floating window.
You need to choose Black, Pixelate, or Blur in Censor Type which mainly determines the type of mosaic you add. At this moment, you can adjust the shape and position of the mask. Because videos are not static like pictures. Therefore, the masking position needs to be changed according to the video playing. So we need to create keyframes ourselves to adjust her position.
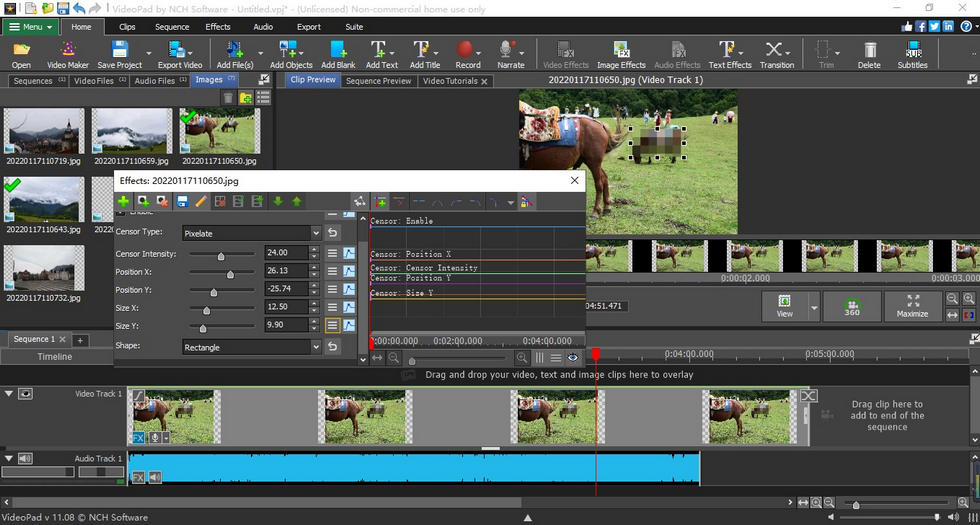
Video Masking Tracking
Add Text
Now, when making videos, especially short videos, adding corresponding text can make the videos more interesting or easier for the audience to understand. VideoPad also supports you to add text to the video. When you click Effects-Text Effects, you will find that there are many styles of text addition. It is worth mentioning the Typewriter Effect because plenty of other video editing software needs to create keyframes manually if they want to apply this effect, which is complicated to operate for editors, especially for beginners.
VideoPad directly sets this effect to a given special effect, and you only need to select the special effect and input the words you want to present to achieve the real-time typing effect. This greatly improves the editing efficiency.
Learn how to add text to videos with VideoPad.You can also add subtitles to your video through this function.
Videopad Add Text
Audio Editing
A complete video product needs not only scrolling pictures but also unique sound effects. Only in this way can you make your video more ornamental. VideoPad supports you to perform many special effects operations on audio. Move the mouse to the audio timeline, and the preview window will show the whole audio.
You can adjust the time interval with the mouse wheel to finish fine modification better. Click FX on the timeline, and many special effects will appear in front of your eyes, such as Noise Removal, Surround Sound, Echo, Chorus, and so on. Nay, you can also record your narration in VideoPad to make your video unique.
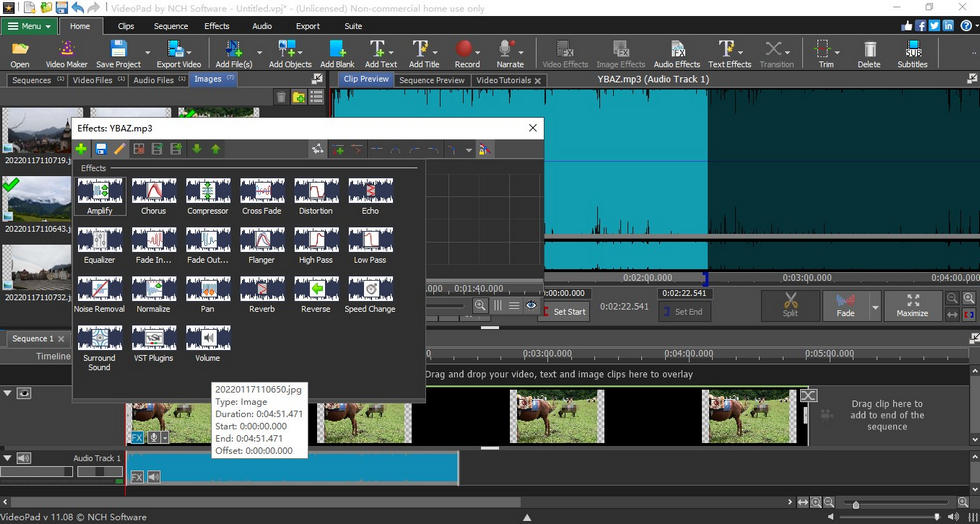
Various Audio Effects
Save and Export
When you are editing videos on VideoPad, it is better for you to get into the habit of saving at all times, so as to avoid some uncontrollable factors in the computer or program, which will cause you to lose all your efforts. Then you will become collapsed. Click Home-Save Project or Ctrl+S to save the file.
When you save for the first time, the system will pop up a pop-up window to let you choose where to save the file. In this way, when you save later, you will automatically replace the previous operation. Of course, if you want to save the following operations to other folders, you only need to use the shortcut key-Ctrl+Shift+S.
After making the video, you will come to the export process. Click Export Video in the menu bar directly, and you will find that there are many options in this drop-down box. You can not only export to different file formats to save on your computer, but also burn to CD-DVD, CD, and Blu-ray, and even export as Image Sequence.
At the same time, VideoPad also allows you to upload videos directly to social platforms or shared network disks. But this option requires your authorization. After clicking OK, a tracking progress bar will be displayed, which allows you to monitor the completion of downloading or uploading in real-time.
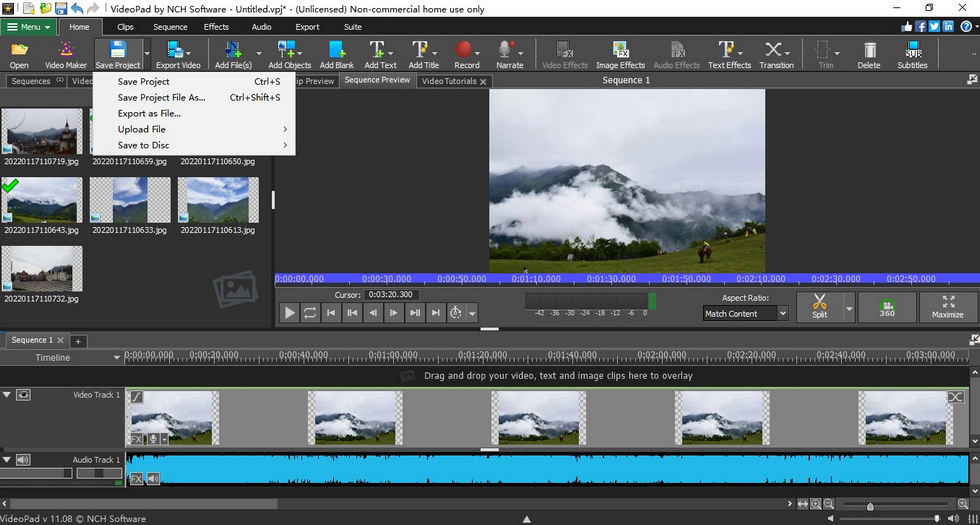
Videopad Save and Export
Device Support
VideoPad works both on Mac and PC. But it is worth noting that downloading VideoPad on Windows will have more functions than on Mac.
Verdict
VideoPad is a very friendly software for beginners because you only need to follow the operation guide for a short time to learn most of its functions. Meanwhile, as a piece of free video editing software, VideoPad can well meet the daily requirements of many people, especially some short video lovers. It can make your video achieve an amazing effect in a short time. Therefore, this feature makes it occupy a place in the highly competitive market. Moreover, VideoPad puts the software in the same series with it in the internal menu bar, so you don’t need to search related websites to download, which effectively avoids the risk of downloading pirated or viruses software.
However, for most professionals, this software is not enough to meet their needs, because many functions of VideoPad are not up to the professional standards, even the paid version. Therefore, if you are a professional video editor, professional software like Adobe Premiere Elements or Adobe After Effects will be more suitable for you.

Karen is a professional writer with a background in column writing who enjoys resolving complex topics and explaining them in interesting ways.
