How to Convert Live Photos to Videos on iPhone and iPad Using 3 Easy Methods
iPhone live photos are not videos but they can be converted into videos. Learn from this page how to convert iPhone live photos to videos using 3 free and easy methods.
How to Convert Live Photos to Videos
I believe many Apple users have been impressed (or even surprised) by the new live photos feature when they first acquired their new iPhone 6S. Live photos are a fascinating form of memory that will make you laugh even decades later.
But how can we convert live photos to videos so we can post them on Facebook, Twitter, YouTube, TikTok, etc.? It is more difficult than how we normally do with actual video and image files, but we’ve found the simple steps to conduct the job easily.
On this page, we’ll take a closer into live photos on iPhone and iPad, we’ll discuss what are they, and how to convert iPhone live photos to videos. Now, let’s dive in.
Do Not Miss: Top 3 YouTube to MP3 Converters for iPhone
What are iPhone Live Photos?
iPhone live photos, introduced by Apple in 2015, is a new photo technology implemented in the 6th generation and later of iPhones, and the 5th generation and later of iPads.
When the feature is enabled, live photos record 1.5 seconds before and after you snap a picture, this gives the photos around 3 seconds of smooth motion which makes the photo more vivid and more “living”.
Enable Live Photos Feature
Is an iPhone Live Photo a Video?
Many Apple users have asked, is an iPhone live photo a video? No, iPhone live photos are not actual video files, while they seem like a video for smooth motion, they are actually animated pictures similar to GIFs.
However, since iPhone live photos are generally a combination of a . jpg image and an .mov video file (which is an actual video format), it’s possible to convert iPhone live photos to videos. And the 3 easiest and most efficient methods are shown below.
How to Save iPhone Live Photos as Videos in Photos
Coming first is the handy method that has been overlooked by most iPhone users.
Lucky for iOS users that there’s an inbuilt option for you to quickly save your live photos on your iPhone to videos within the Photos app. All you need to do is to find the live photos from your photo collection and follow the steps below.
The following method shows you how to save one single iPhone live photo to a shareable video in the Apple Photos app.
Step 1. Open iPhone Photos App
Launch the Photos app on your iPhone, it’s preinstalled on your iPhone, and it should be available from the iOS’s home screen by default.

Open Photos App
Step 2. Select the Live Photo
Go to the Album from your Photos app, browse from your photo collection, and select to open the live photo you intend to convert to video.
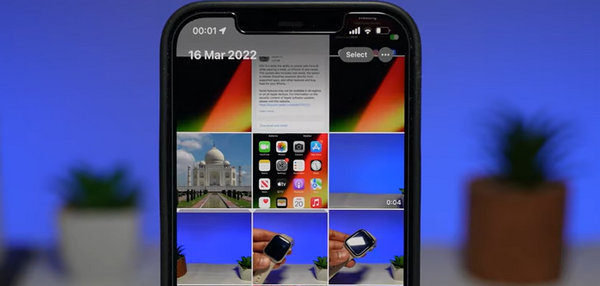
Select the Live Photo
Step 3. Share the Live Photo
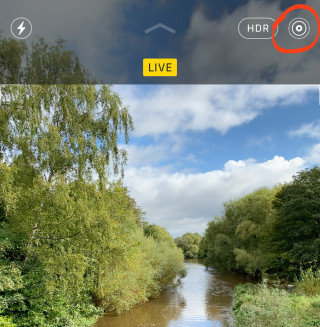
To check if it’s the live photo, check if there’s a Live icon at the upper-left corner. You can press and hold on to the image to see the before/after movements of the photo.
Then hit the share icon from the lower-left corner to enter the share menu.
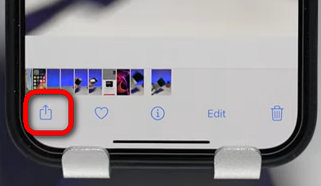
Share the Live Photo
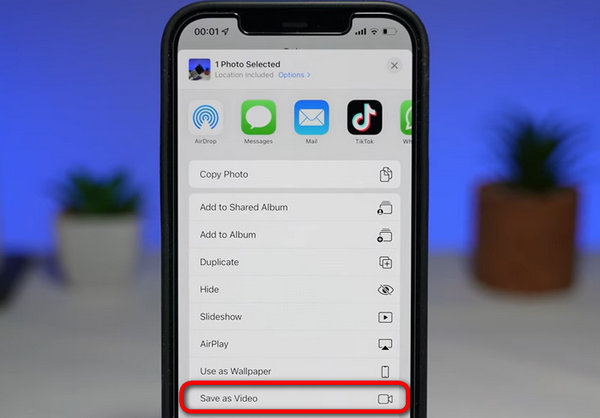
Step 4. Save Live Photo as Video
And then the live-photo-converted video can be easily found in your photo library, in the All Photos section, within the Photos app. You’ll notice that it’s a new video with 3 seconds duration in your album.
Now it’s time for sharing!
Save Live Photo as Video
How to Convert iPhone Live Photos to Videos Using Lively
If you intend to flexibly convert multiple iPhone live photos to videos, or even edit your live photos, then the inbuilt save-as-video feature for live photos on iPhone won’t be enough.
An app from Apple App Store called Lively helps make GIFs and videos from live photos in your gallery.
Making it possible for you to share your live photos on your iPhone to social media or chatting apps such as Messenger, Whatsapp, Facebook, Twitter, TikTok, and more.
Please Note: There are other different apps that bear the name ‘Lively’, the Lively app we’re using hear is now named after: Lively – Photos to GIF.
Converting iPhone Live Photos to Videos Using Lively
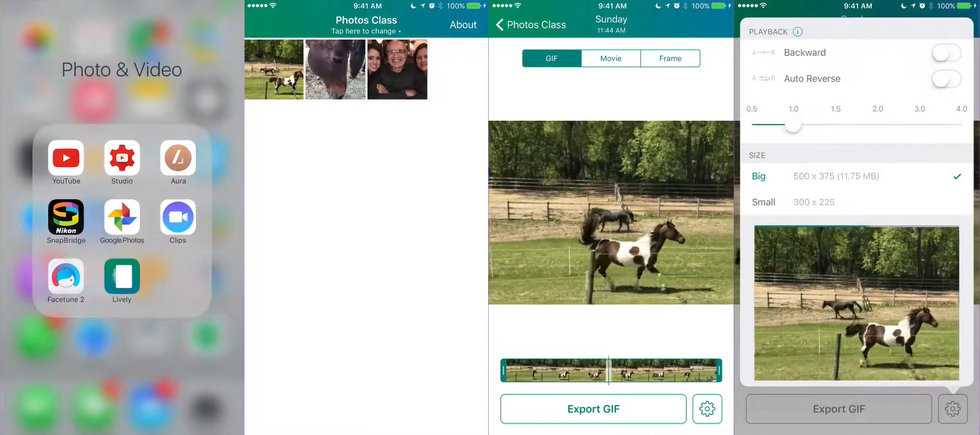
Step 1. Download and install Lively app from App Store. Launch the Lively app on your iPhone when it’s fully installed.
Step 2. From the Lively app, select the live photo you intend to convert to video.
Step 3. Hit the Movie tab from the upper side of exporting screen, which then allows you to view your live photos as videos.
Step 4. Change the Playback manner to Backward and Auto Reverse if needed, and adjust the size of the output video file.
Step 5. Hit the Export Video button to export the live-photo-converted video to your album.
How to Convert iPhone Live Photos to Videos with Loop and Bounce Effects
The built-in loop and bounce photo effects in iPhone’s Photos app automatically generate a continuous video output video, which means they can be used to convert iPhone live photos to videos as well.
- iPhone Photos loop effect: Make an endless and continuously repeating video
- iPhone Photos bounce effect: Make a video that plays forward and then backward
The converted loop or bounce videos can be found in the animated album in your Photos app.
To demonstrate, I’ll make a loop video from a live photo on iPhone. The steps for using the bounce effects are similar.

Loop Live Photos on iPhone
Step 1. Launch the Photos app on your iPhone and select open a live photo.
Step 2. Swipe up to see the effects options.
Step 3. Tap on the loop effect to apply it to your live photo.
Step 4. And then your live photo will be automatically converted to a loop video stored in the animated album.
Please note that loop and bounce videos on iPhone don’t have sounds. So this method is not suitable if you need the original sound of the video. Otherwise, you can check our guide on how to add music to video on iPhone to add music tracks to your loop or bounce videos.
To Sum Up
Saving your iPhone live photos to videos make your live photos more compatible for you to share with your friends or followers on social media, such as TikTok and YouTube short videos. Thus it’s a good practice to convert iPhone live photos to videos, give it a try if you haven’t already!
I hope you like the information shared on this post, if you find the information helpful, please help share it so more people will know about it.

Karen is a professional writer with a background in column writing who enjoys resolving complex topics and explaining them in interesting ways.
Related Articles
Duo Video Converter
The best free video converter in Microsoft Store.
- Free and no limitations.
- The fastest conversion rate you can imagine.
- Converts video and audios between 22+ formats for free!
- Support files of any size or format conversion.
- Convert high quality films without quality loss.