How to Edit Gaming Videos for Free
This article teaches you how to add effects, change the speed, and add picture-in-picture to the game video.
Viewers often tune in to watch game highlights and step-by-step tutorials to “Let’s Play” gameplay walkthroughs for finishing a difficult stage of the game. Gaming content has opened new avenues for niche content creators. As a matter of fact, gaming had its biggest year on YouTube in 2020. With over 100 billion watch hours on the platform, the time for gaming videos has officially arrived, and there is no denying it. It is amongst the most upcoming and lucrative genres in content creation.
Creating gaming videos requires a computer with a decent configuration. Recording the game while running it requires a formidable amount of computing power. Or else, you will experience a lag in the game, which will consequently affect the recording. Next in line are the fundamentals of recording good gaming videos. Content is the king, and your focus should start there. Look for games that are trending, and create gaming videos revolving around them.
After playing and recording the gameplay, you already have invested a large chunk of time. The editing part should be devoid of hurdles and done in minimal time. That’s where FilmForth comes in, with its unbelievably easy interface, powered by reliability, capability, and modern editing tools.
Edit Gaming Videos With FilmForth
1.FilmForth – Edit Gaming Videos the Right Way
FilmForth is a free, easy-to-use, and accessible video editor that free of watermark and suitable for beginners and intermediates. Edit gaming videos for YouTube, Twitter for free using this video editor, designed keeping in mind users who are starting editing.
Essentials Checkpoint:
- Download and install FilmForth from the Microsoft Store.
- Create a new project by clicking on the New Project button. You can add videos using the drag and drop feature, apart from the manual method.
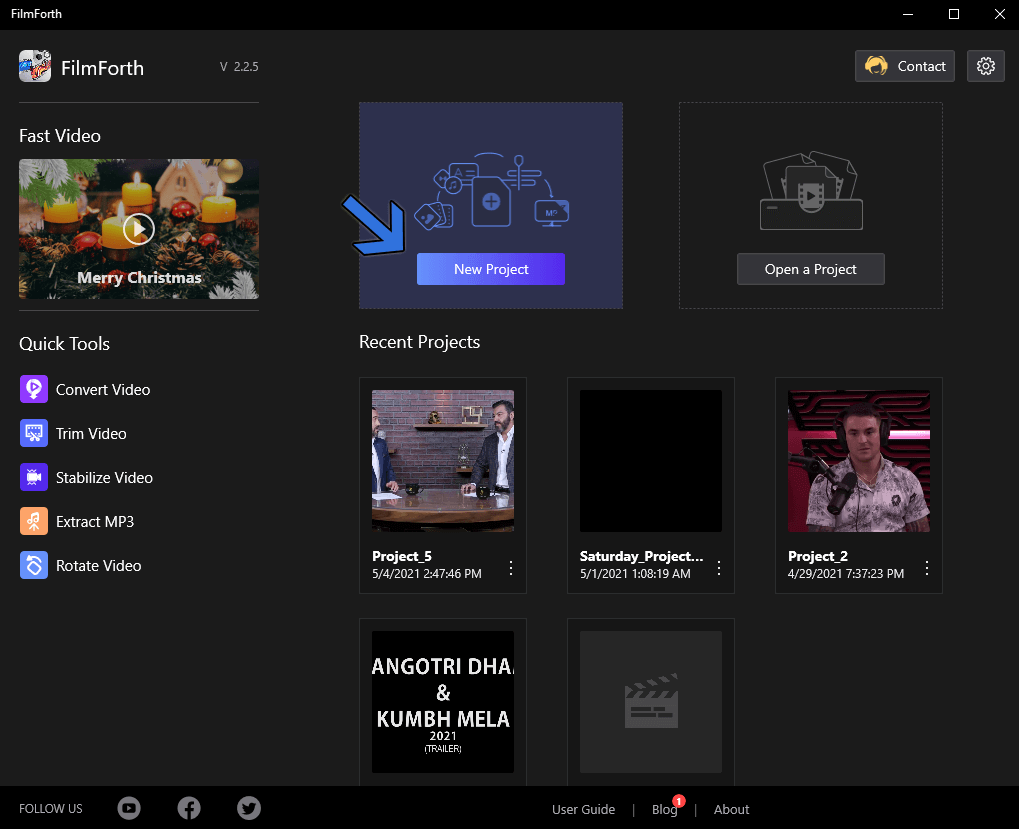
Launch New Project
- Keep a backup of your recorded video. Data corruption can be really inconvenient at times.
2. Split & Cut Out the Boring Parts of your Gaming Video
Remove unwanted parts of the footage from the video using the split feature.
Step 1. Move the seek bar to the point from where you want to split the video.
Step 2. Click on the Split button, located in the tool’s dashboard.

Split the Video
Step 3. As we can see, the video has been split into two parts. You can further split it to delete the unessential parts of the footage.
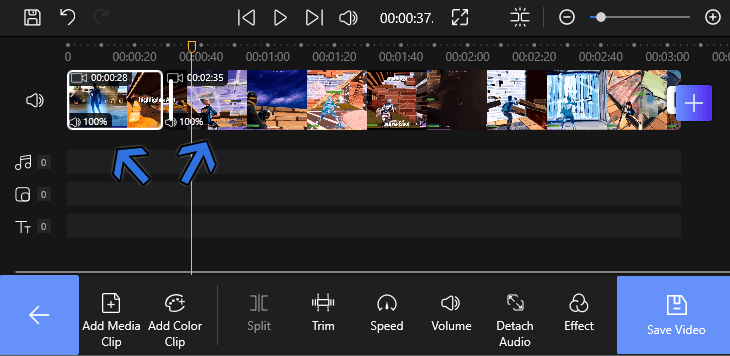
Delete the Unessential Parts
3. Join the Remaining Parts With Transition
The remaining clips should not look out of place while playing as a single video. Transitions help different bridge parts into a cohesive video.
Step 1. Head to the timeline feed and look for the transition buttons, where the two clips are meeting. Click on the Transition button and head to the Transition menu.
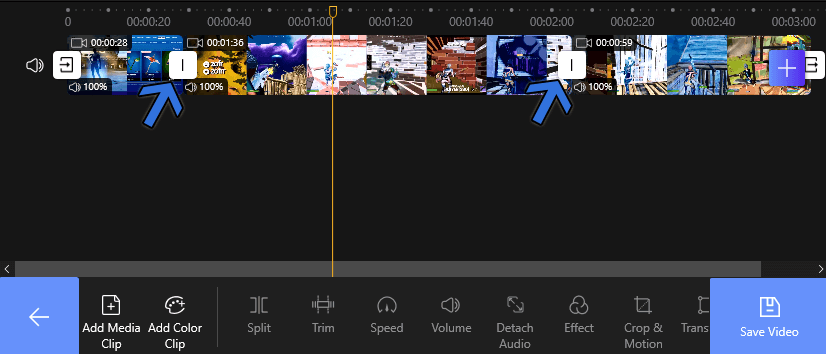
Add Transition
Step 2. With over 36 options, select the transition which goes with gaming content.
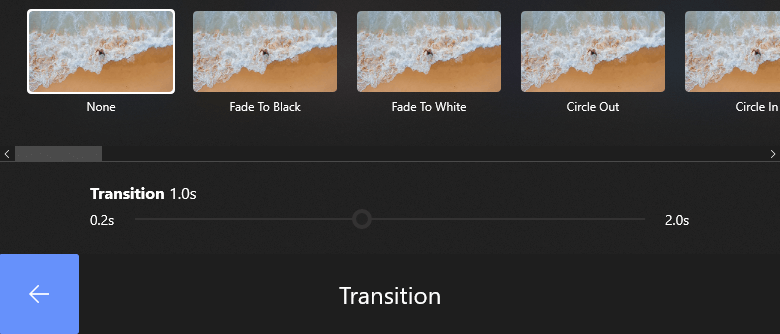
Select Transition
Step 3. After selecting the transition, set the transition time, ranging from 0.2 to 2 seconds. The time determines the speed of the selected transition.
4. Add Effects to the Gaming Video
Once the video clips are in order, we move to the aesthetic part of the video. Add different effects for standing apart from the crowd.
Step 1. From the Edit menu, select the video clip on which you want to apply the effect.
Step 2. Head to the Effects menu from the tool’s dashboard.

Head to Effects Menu
Step 3. Try out different effects from the variety of over 28 effects options.
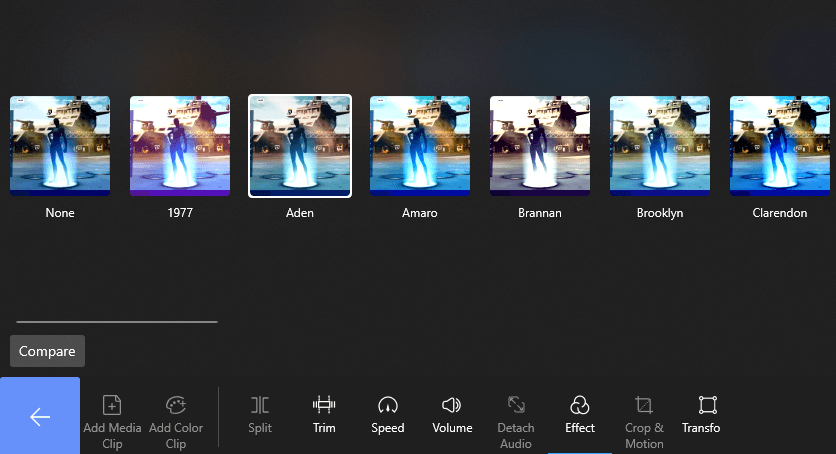
Select Effect
You Must Know – Use the compare button for comparing the effects with the default colors of the video.
Step 4. Select the effect which suits the video and then hit the back button to save the changes.
5. Add Audio to the Video
As we move from visual to the audio section, lets us add audio to the video. Preferably a background music track that goes with the game.
Step 1. Head to the Audio menu from the shortcut given in the timeline feed.
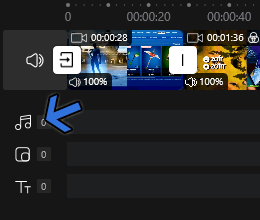
Head to Audio Menu
Step 2. Select the Add Audio button from the tool’s dashboard.

Click “Add Audio”
Step 3. Import your audio using the “Add a local audio file” button. Locate the audio file from your local storage.
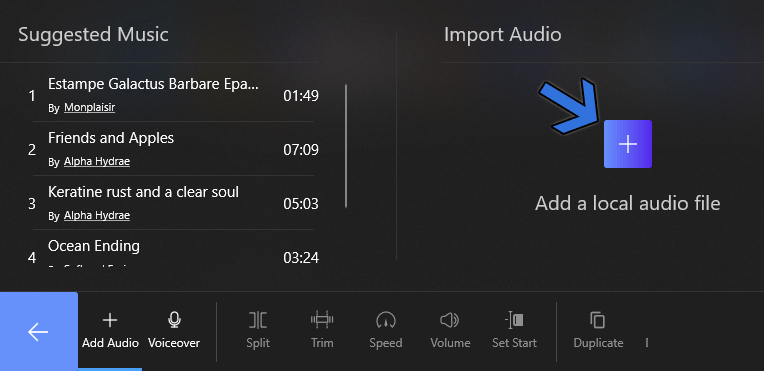
Import Audio
Step 4. The added audio will appear as a red bar in the timeline feed.
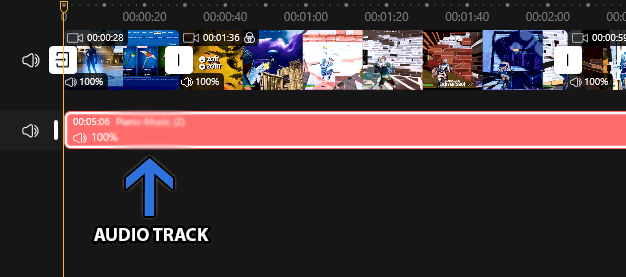
Audio Track
You Must Know – Keep in mind the duration of the audio added. Take advantage of the audio tools located in the bottom dashboard. Use it for trimming, setting volume, among other things concerning the audio.
6. Add Text to the Video
Add text and subtitles for audiences belonging to various demographics.
Step 1. Just like the audio button, find the text menu button from the timeline feed.
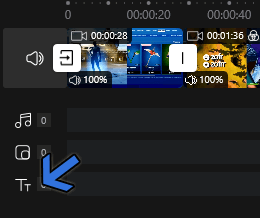
Head to Text Menu
Step 2. Click on the Add Text button, located in the bottom dashboard.

Add Text
Step 3. A textbox will appear on the screen; click on the Edit text button, given at the bottom.
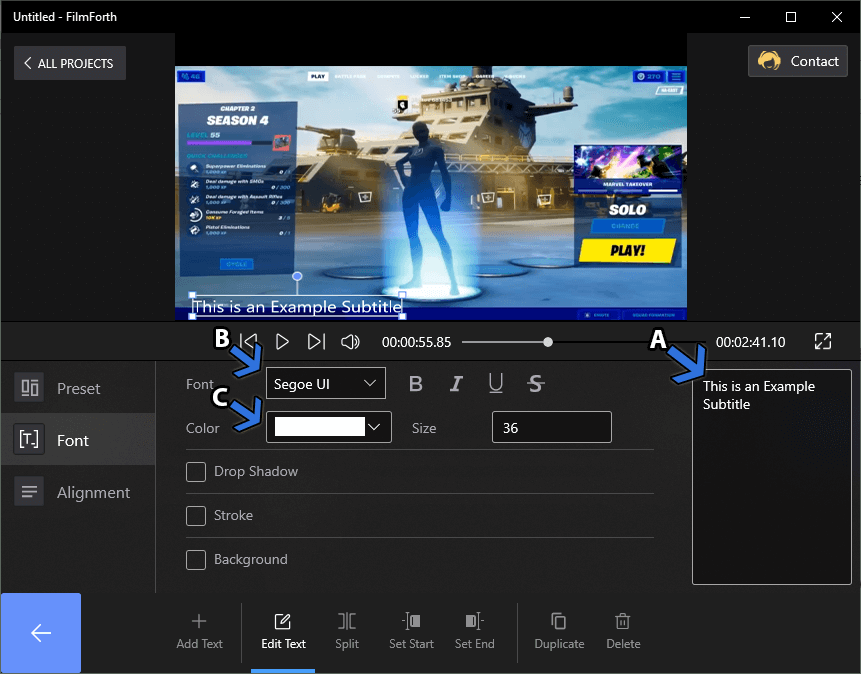
Edit Text
- You can place the subtitle anywhere on the screen with the help of the mouse pointer.
- On the right is where you will add the text, as denoted by the arrow A.
- Try different fonts, as denoted by the arrow B.
- Change the color of text, as denoted by the arrow C. It is accompanied by the options of drop show, background, and stroke around the borders.
- Alignment has a dedicated menu, given on the left side of the menu.
7. Add Picture in Picture – Add Your POV in Gaming Videos
When you are killing it in the game, viewers demand to know your mouse-keyboard movements. It helps them improve and learn from your gameplay.
On other occasions, many streamers add their face-cam, occupying a small part of the screen.
Step 1. Head to the Picture In Picture menu from the shortcut located in the timeline feed.
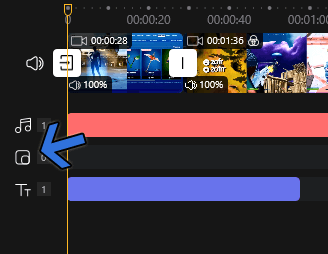
Head to Picture in Picture Menu
Step 2. Click on the Add Pic in Pic button and import the video.

Add Pic in Pic
Step 3. The video will appear as an overlay over the base video. You can resize, rotate, and move the added video around the screen.
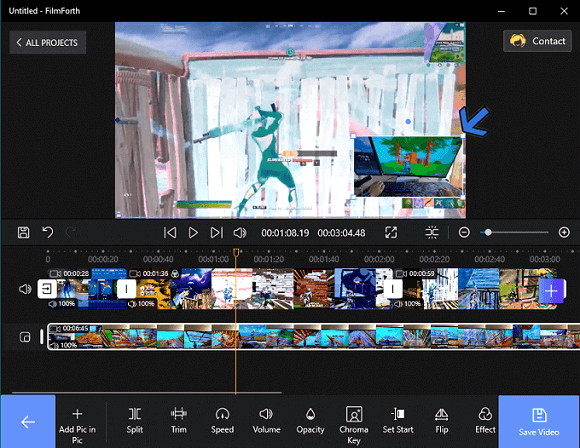
Overlay video
You Must Know – The overlay video can be edited as well. Take advantage of the tools given in the dashboard of the Picture in Picture menu.
Saving Up
After all the edits and changes are made, export the video using the Save button. Located on the right side of the window, irrespective of the menus. Before saving the video, you are able to select your video resolutions, quality, and frame rate. Besides, you can tick off the “Export with a watermark”.
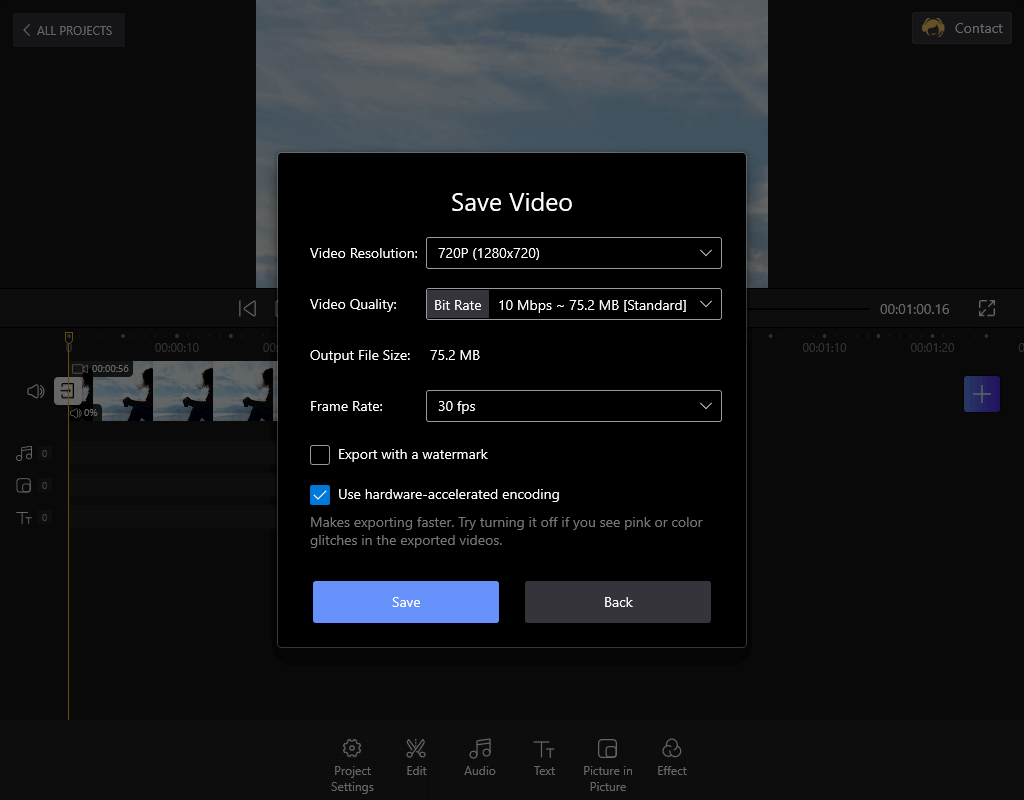
Save Video
The Bottom Line
Every gaming video creator, streamer started with not-so-great videos, with underwhelming edits. Editing has a broad learning curve; you get better with time. Don’t beat yourself if your gaming videos are not comparable to the industry-leading players. Start small with FilmForth and edit gaming videos while learning your way up. The editor is more than capable of editing videos of all kinds.
Related Articles
FilmForth - Free Video Editor
- Easy to use and no skill required at all.
- Export video to MP3 with one click.
- Add transitions, effects, filter, text to the video as you want.
- Remove, replace, record and edit the background audio easily.
- Change the speed, volume, and subtitle on video with ease.
- Stabilize, trim, rotate, and convert video in seconds.


