How to Fade out Video on Windows 10
This post introduced the newest detailed steps to fade out the video on Windows 10.
Proper transitions between scenes in a video are the building blocks of the content. Some people prefer the subtle fade out in videos to take one scene from to another. Professional editors also use it to conclude a scene or suggest an end to the video.
A few excellent Windows video editors are capable of adding fade-out effects to the video, audio, pictures, etc. It’s quite easy to add transitions like a fade out to a media clip, you can just choose a free video editor which can make it with ease.
This video reveals the detailed steps to fade out/in a video on Windows 10 for free.
Step 1. Launch the Video Editor
You need to download and install FilmForth from the Microsoft Store on Windows 10. FilmForth is totally free to use and it has no watermark while exporting the video. Once the download is completed, you can run it on your computer.
So far, FilmForth can only work on Windows 10 and Windows 11.
FilmForth – Add Fade out Effect to a Video for Free
Adding transitions like fade out to video, audio, pictures for free, and no watermark.
- No Skills Required to edit the video.
- No purchase-in-app.
- Save & Share Without Watermark
Step 2. Upload the Video
Now upload the video you want to add fade out to FilmForth. Tap on the New Project to upload the video from your computer.

Upload Video to FilmForth
Then there will pop up a new window, tap the Add Video/Photos Clips, or drag and drop the video to FilmForth.

Drag and Drop the Video to FilmForth
Step 3. Fade out the Video
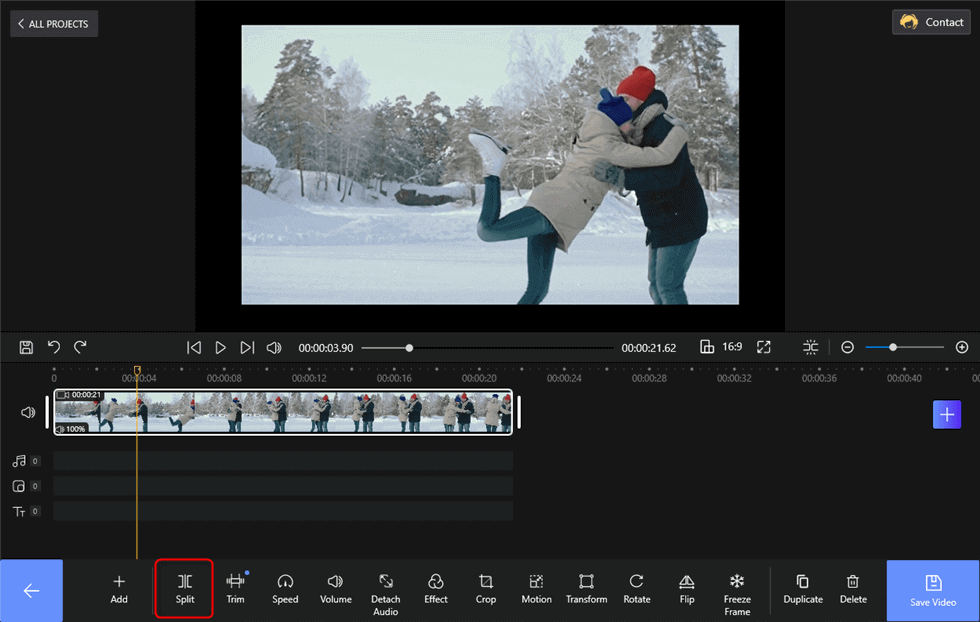
Essentially, you need to divide the video into smaller parts if you want to fade out for different scenes. According to your needs, take the help of the split option to divide the video into different parts that you want to fade out.

Split the Video on FilmForth
And then tap the button at the end of the timeline of the video. You will see there had popped up a window that contained all the transitions including the fade-out(fade to black). Choose the fade-out effect and set its duration of the transition, which can be set between 0.2s to 2 seconds.

Choose Fade out and Set Duration
Without splitting the video, you will add the Fade Out effect and other transitions to the start and end of the video.
Step 4. Save & Export the Video
The transition was added and you can back to the video and play the video to preview the fade-out effect. Click on the back button to save the fade-out selection. You can always go back and change.

Save the Fade out Video
Some FAQs of How to Fade out Videos
In the following part, you’re going to learn the answers to some faqs while fading out videos.
Where’s the fade-out/in transition effect used?
Fade-outs are generally used to conclude a scene or the entire video itself. The screen goes at a slower pacer, depending on the effect that the director wants to convey. Fast-paced fade-outs are often seen in horror movies, followed by equally swift fade-outs that set the undertone. They indicate the end to the scene, video, that the video editor has in store for the viewers.
We all have seen Fade In at the starting of a TV show, scenes in movies where the camera is panned on the main character, object. Generally at the starting of an episode or a scene. The shot is dark and gradually becomes brighter.
Combine fade out and In in a gradual way, and you have a great way to signify the passage of time.
Let’s talk about the colors of fades
The whites are often used to weave a sense of ambiguity or draw a sense of hope. Blacks are generally reserved for scene transitions and credits. Any other colors are dependent on the color grading and what the director-editor duo wants to convey to their audience.
You don’t have to be an expert for adding Fades in a video. FilmForth is sufficient to get you across the finish line without requiring any expertise in editing. All you need is the video divided into several parts according to the scenes and then taken advantage of the transition menu.
What is fade-in video editing?
Fade in and fade out are 2 gradual transitions from one media to another. The terms fade-out (also called fade to black) and fade-in are used to describe a transition to and from a blank image.
How do I fade in black video?
In this post, you can easily learn the 4 steps to fade in black video. Just download FilmForth and follow the steps to complete it.
Conclusion
Fading out videos is no longer a problem. You can do that easily with FilmForth, a video editor which dons many feathers in its hats. Whether it’s taking out MP3 from videos or adding picture-in-picture, the free video editor has impressed us.
Related Articles
FilmForth - Free Video Editor
- Easy to use and no skill required at all.
- Export video to MP3 with one click.
- Add transitions, effects, filter, text to the video as you want.
- Remove, replace, record and edit the background audio easily.
- Change the speed, volume, and subtitle on video with ease.
- Stabilize, trim, rotate, and convert video in seconds.


