The Best Free 4k Video Editing Software
This article recommends six free and paid 4K top video editors.
Ultra HD video quality will become prevalent in the coming future. Be ready to edit such footage with the best 4K editing software that caters to all your needs. The cheaper 4K TVs are already hitting the market shelves, and you can expect to be the next dominating resolution standard after 1080p.
There was a time when 1080p, also known as FULL HD, was considered the apex of display on screens. Digital displays have become finer, and so is the screen resolution on them. The 4K television and display market picked up around 2014 when the prices of the LCDs with higher resolutions went down/
In technical terminology, 4K refers to the horizontal pixel count of approximately 4000 pixels. For instance, 3840 x 2160 is a common 4K resolution found on most displays around the world. With the advent of higher resolutions and supporting displays, it’s time we look for 4K video editors. The editing applications that are capable of handling UHD videos.
Free 4k Video Editor – FilmForth
The latest version of FilmForth is an easy-to-use, feature-rich free video editor for your 4K editing needs. With constant updates being pushed out, you will not grow out of it for a long time.
You can directly import 4K videos in multiple formats to the editor. While exporting the videos, you can change the resolution according to your need. Get ready to experience extraordinarily fast import and industry-standard rendering of videos.
The main features FilmForth
- Import 4K Videos Directly
Load your 4K videos directly into the editor—no need to tone it down like other editors. FilmForth can handle 4K with ease while catering to a variety of media container formats.
- Stabilize Videos
You just shot a UHD video, but the gimble gave up midway. As a result, we get a shaky video that is of no use. Shooting again is out of the question. Video stabilizer tools on this editor can help reduce/eliminate shakiness and make the videos stable to an extent.
- Trim, Cut Content
Reduce the length of your content using trim, cut tools. Keeping the attention of viewers is an essential part of post-production editing.
- Add Overlays
Add overlays on the video. We have the option of adding images and images. Furthermore, you can also remove the background of the videos using the Chroma key feature.
- Configure the Frames(FPS)
Frames define the quality of your videos. The more, the better in most cases. Set them according to your need, between 5 to 60 FPS. You get the option while saving the video.
Steps to edit 4k resolution video via FilmForth
Step 1. Install FilmForth from the Microsoft store. Launch FilmForth, and create a new video project. You do that by clicking on the new project button.

The Best Free 4k Video Editing Software
Step 2. After creating the project, it’s time to upload your 4K video. Use the Add Video/Photo Clips button for importing videos.
When using the import buttons seems like a lot of work; you can always take advantage of the drag and drop feature.
Step 3. You have successfully imported the video; it will appear in the timeline feed. Let us try a few of the many editing tools/features that FilmForth packs.
Trim Your Video
Start with trimming as the video file that might be longer than what you have in mind.
Step 1. Select the video from the timeline feed, and head to the trim menu from the tools dashboard.

Trim Video
Step 2. While being in the trim menu, the blue bar represents the video in all its duration.
Use the white handles on the bar’s ends for trimming the video. Slide the left handlebar at the starting of the video to the right. It will trim from the starting of the video.
Do the same with the handle at the end of the video but slide it in the opposite direction, to the left.
You Must Know – The trimmed part of the video can be brought back by sliding the handlebar. You slide it in the opposite direction of what you initially did earlier.
Add Effects
Moving on to the aesthetic part, let us add effects to the video for setting the scene.
Step 1. Head to the effects menu from the tools dashboard.

Add Effects to Video
Step 2. Try out different effects from the options in front of you. You can compare with the original color tones by clicking on the compare button.
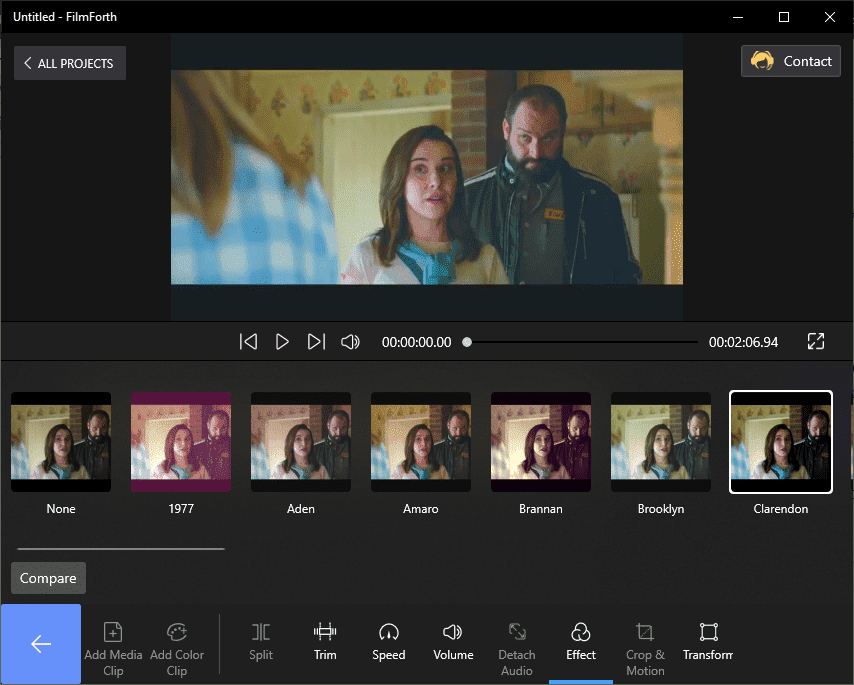
Add Effects as You Like
You Must Know – You can change effects anytime by coming back to the menu. Removing effects is also easy; just select none from the effects scroll menu.
Step 3. Click on the back button to save the effects on your video.
Add Slow Motion
Amp up the drama by adding slow motion to your videos.
Step 1. Head to the Speed menu from the tools dashboard.
Step 2. Slide the button to the left, lower than 1x, for slowing down the video. Experiment and calibrate the slider button according to the frequency of slow-motion needed.
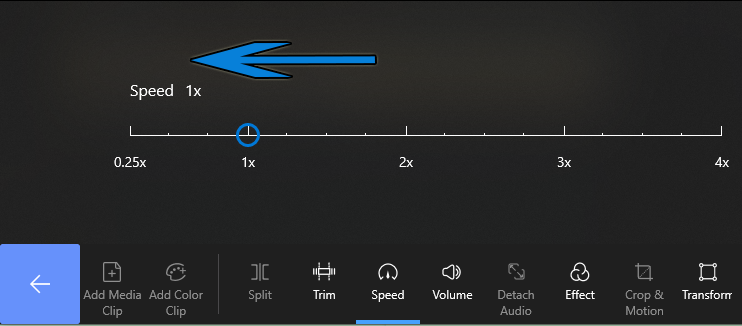
Add Alowmotion
Best 3 Free or Paid 4k Video Editing Software
We look towards other 4K video editing options. You can try them to edit high-definition videos without a hiccup.
OpenShot
- Price: Free
Starting with a free, open-source video editor. OpenShot delivers a powerful package of video editing utilities on its editor.
- Features
Layer Composting for better management of different layers of images, videos, overlays, and more.
Never run out of space with unlimited tracks/layers.
Edit and mix audios with the help of the waveforms displaying your timeline feed.
- Add Effects through OpenShot
Step 1. Drag and drop to the timeline for adding the videos.
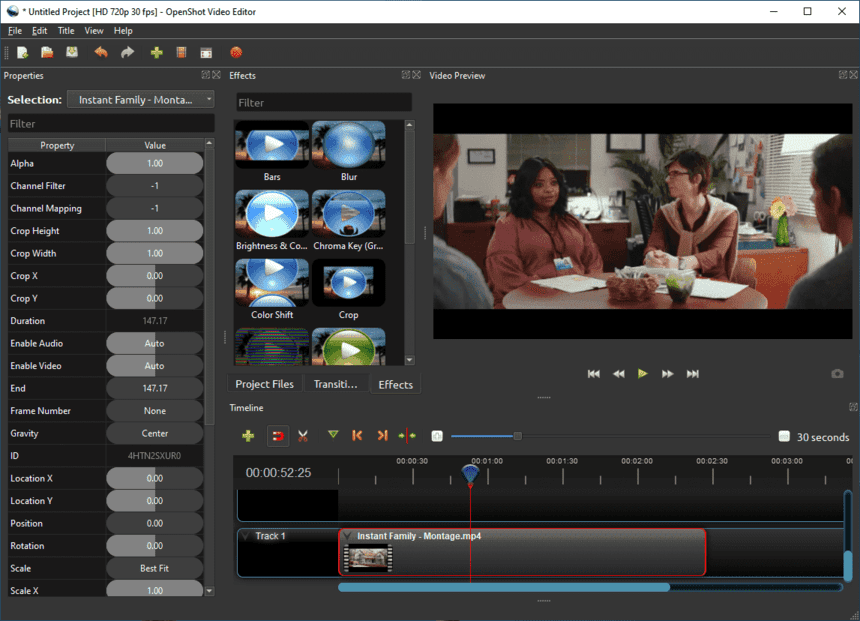
OpenShot
When you overlap two videos, a rectangular blue box appears between the two videos.
Step 2. Click on that to add transitions between the clips. You will see a menu appear above the timeline feed with the option of over 400 transitions.
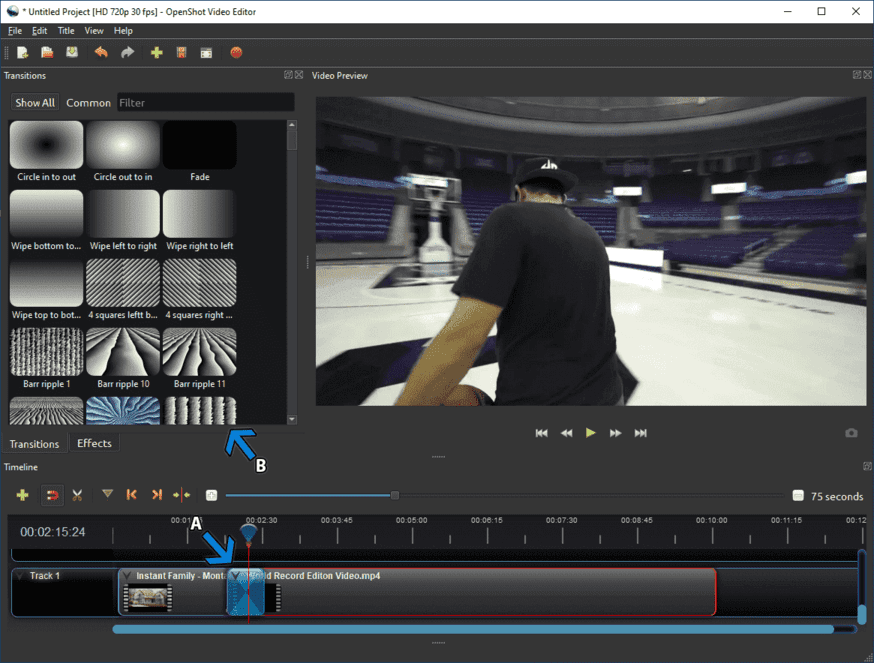
Add Transitions Between The Clips
Step 3. Select one to apply on the video, and you test drive them from the preview window.
BeeCut
- Price: $59.95 – Lifetime license
BeeCut is a 4K video editor that comes with a modern user interface. The operations are easy to perform with clear and concise segmentation of every feature. It is a paid application with a trial that offers limited features.
- Features
Video Presets for sharing videos on TikTok, Facebook, YouTube, and other websites.
Multiple formats for your subtitles.
Fine-tune videos with content masks that aid in blurring, highlighting, or hiding specific elements.
- Add Overlays through BeeCut
Step 1. Drag and drop the video to the local mat as it is called in the editor. After that, drag them in a similar fashion to the timeline.
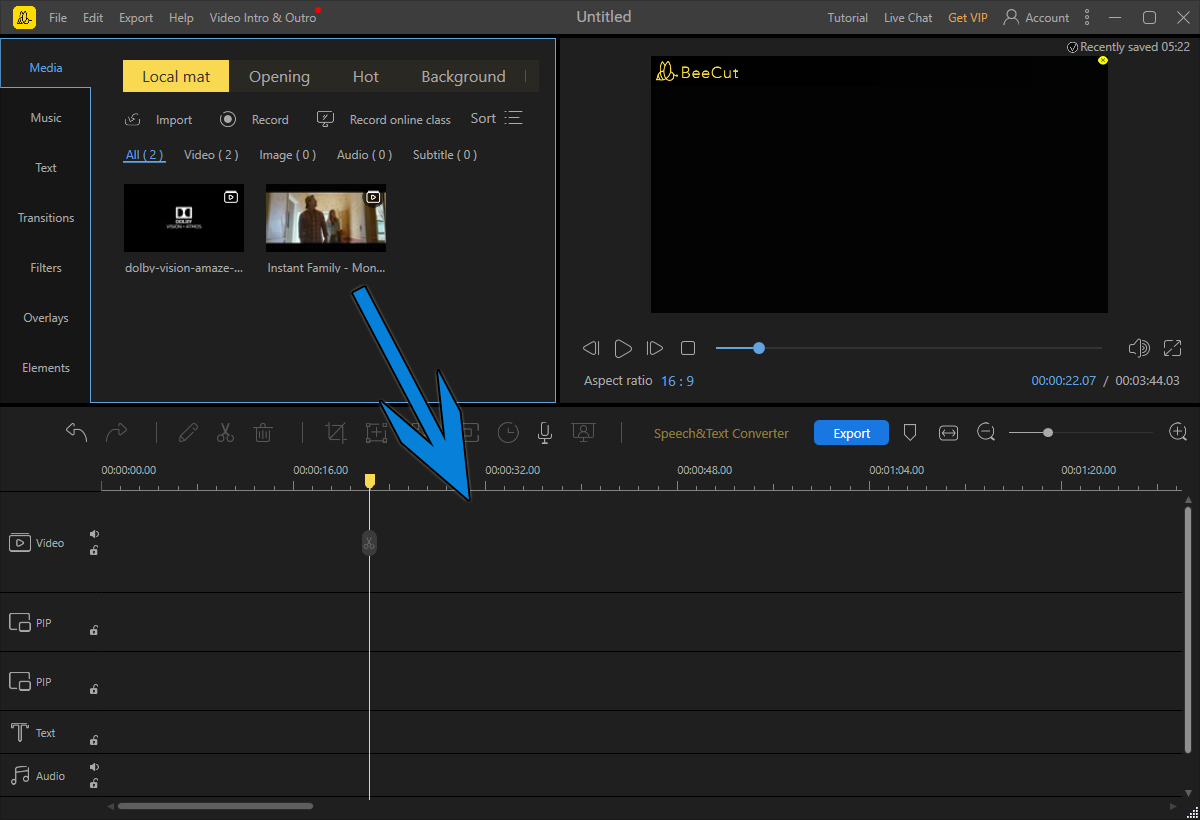
BeeCut
Step 2. Head to the overlay section from the left side menu.
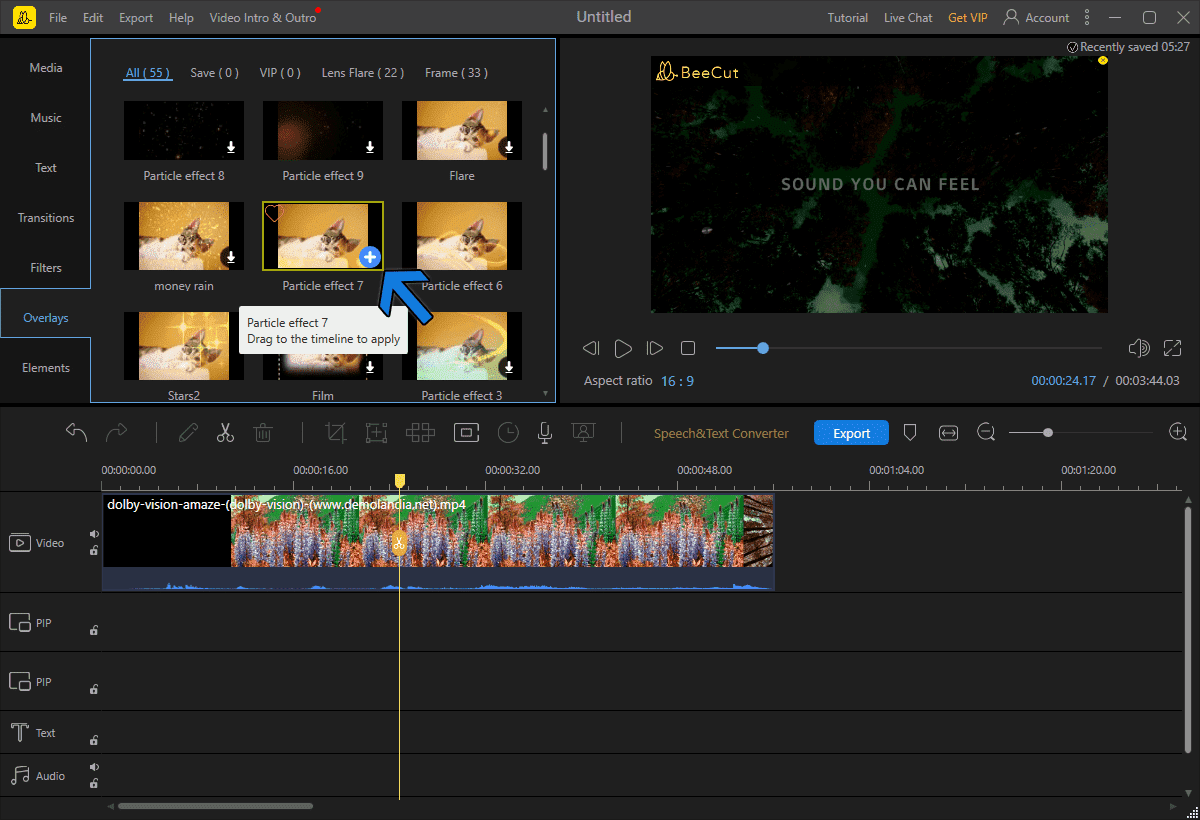
Overlay Video
Step 3. Select the overlays you like, and it will download them from the server.
Step 4. Then, a plus sign will appear on the overlay. Click or on it to apply the overlay on the video.
Step 5. It will appear as a separate item in the overlay section of the timeline. You can stretch it to increase its duration or vice versa for trimming the duration.
VSDC Video Editor
- Price: $23.59
Looking for a premium tool for free? VSDC video editor might be the answer. The free version offers plenty of room and features to meet your editing needs.
- Features
Designed for running on the slowest and oldest of PCs.
In-built screen capture tool that would help in creating tutorials/explainer videos.
Blend multiple layers of footage into a single composition.
Step 1. Import the video through the drag and drop feature.
Step 2. Find the text menu in the toolbar, located left to the preview video player.
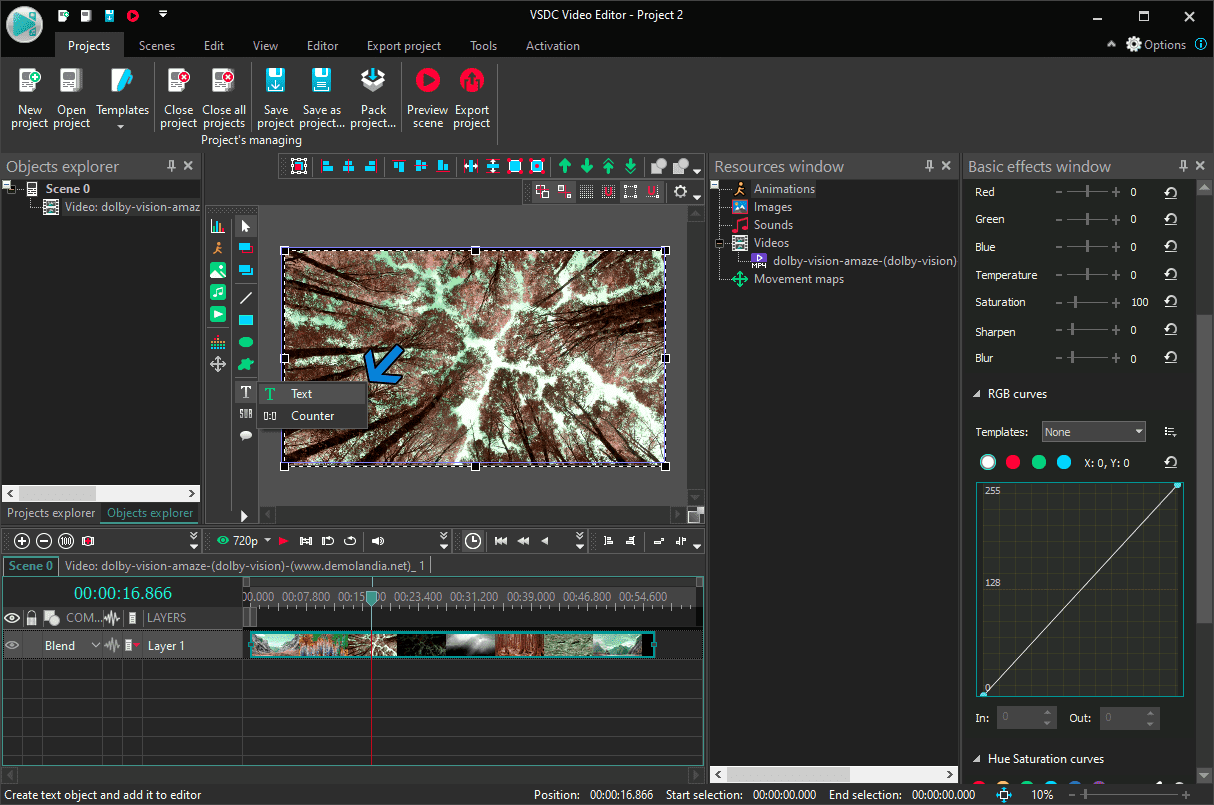
Add Text over the Video
Step 3. The object position menu will appear on the screen. Here you choose the position of the text. We select the From Cursor Position that enables us to click anywhere on the screen.
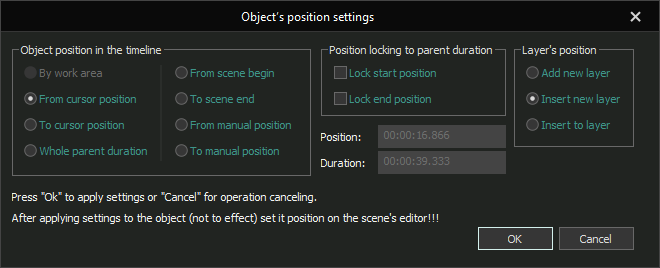
Object’s positon settings
Step 4. Click on the part of the screen where you want to add text. Next, a text box will pop up. Start typing, and it will appear on the screen. The duration of the text can be calibrated from the timeline.
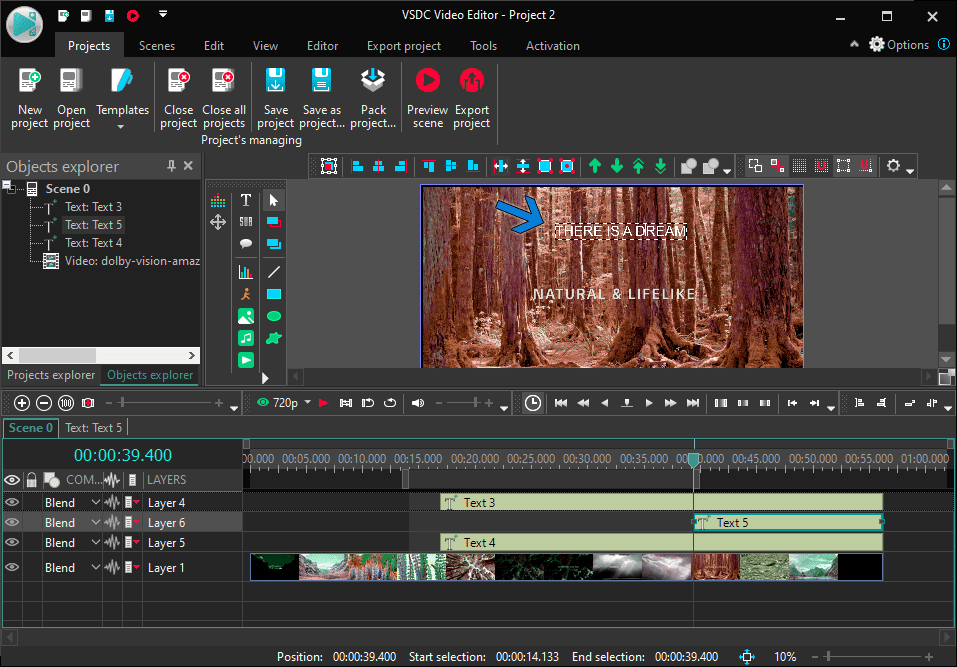
VSDC Video Editor
Conclusion
There are hundreds of 4K video editors out there, but we narrowed it down to a few of the best editors. You can get started with FilmForth, a fairly easy-to-use video editor. When things get overwhelming, there is a tutorial section on their website to get you through.
One thing to keep in mind is to make sure to select the 4K resolution while exporting the video. Some 4K video editors tend to reduce the resolution to save up storage space, rendering time.
Related Articles
FilmForth - Free Video Editor
- Easy to use and no skill required at all.
- Export video to MP3 with one click.
- Add transitions, effects, filter, text to the video as you want.
- Remove, replace, record and edit the background audio easily.
- Change the speed, volume, and subtitle on video with ease.
- Stabilize, trim, rotate, and convert video in seconds.


