How to Remove Background Noise from Videos: 3 Free, Fast, and Effective Methods
This page contains complete instructions that show you 3 free, fast, and effective methods for you to remove background noise from videos.

How to Remove Background Noise from Videos
While having wanted noises in your footage is an inevitable situation, background noises in your videos and camera recordings are a real buzzkill. Deleting the noises from your videos eases the distractions and will bring a better viewing experience to your audience.
There are various ways for removing the noises in your videos, such as wiping out the entire soundtrack or filtering out the noises. Now follow the instructions in this following to remove background noise from videos using 3 free, fast, and effective methods.
Do Not Miss: The 22 Best Video Editing Software (Free and Paid)
Table of Contents
How to Remove Background Noise from Videos Using FilmForth
Audio remover applications are a preferable option for deleting noise from videos by detaching and removing the soundtrack. So here comes the first introduced method, the best free video noise remover FilmForth Audio Remover.
Aside from muting your videos as a reliable audio remover tool, FilmForth is also packed with tons of audio & video editing features for you to add music to videos from the inbuilt music library, change video volume, or add transition effects to your videos in post-production.
FilmForth is a well-received and highly-rated app from Microsoft Store, so if you’re running a Windows 10 or Windows 11 computer, go check it out and free download it now to get started!
Step 1. Create a New Project
Launch FilmForth on your computer and hit the New Project button to create a new audio-removing project.

Create a New Project in FilmForth
Step 2. Import the Video with Noise
Then hit the Add Video/Photo Clips button to import the video with the background noise you intend to remove.
*Please note that following this tutorial will wipe out the audio track of the imported video, please backup the original footage if needed.

Import Video with Noise to FilmForth
Step 3. Detach Audio from Video
Select the video clip in the timeline and hit the Detach Audio button below to detach the audio track with noise from the original video.
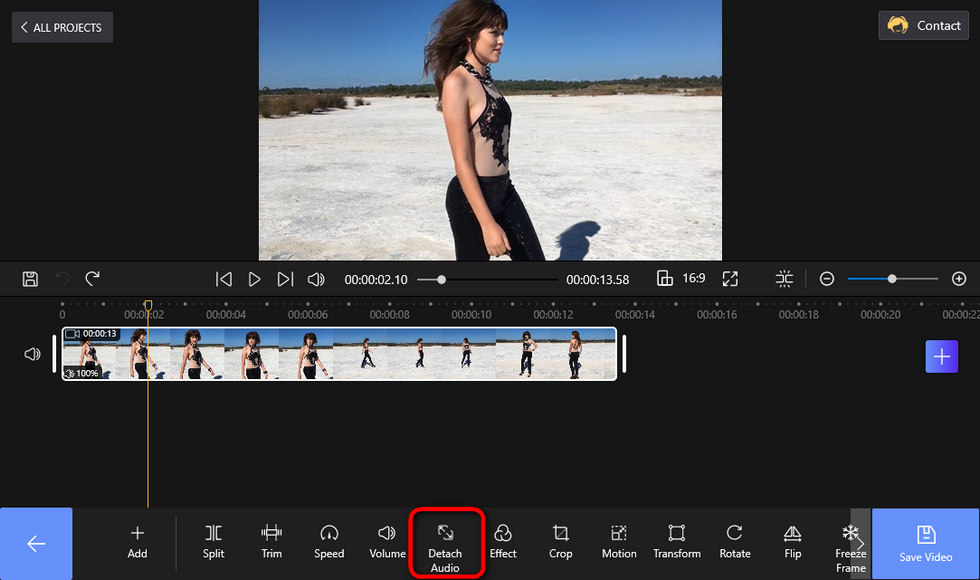
Detach Audio from Video in FilmForth
Step 4. Remove Background Noise
Click to select the detached audio track in the timeline, and hit the Delete button from the lower-right side to remove the audio track that contains noise.
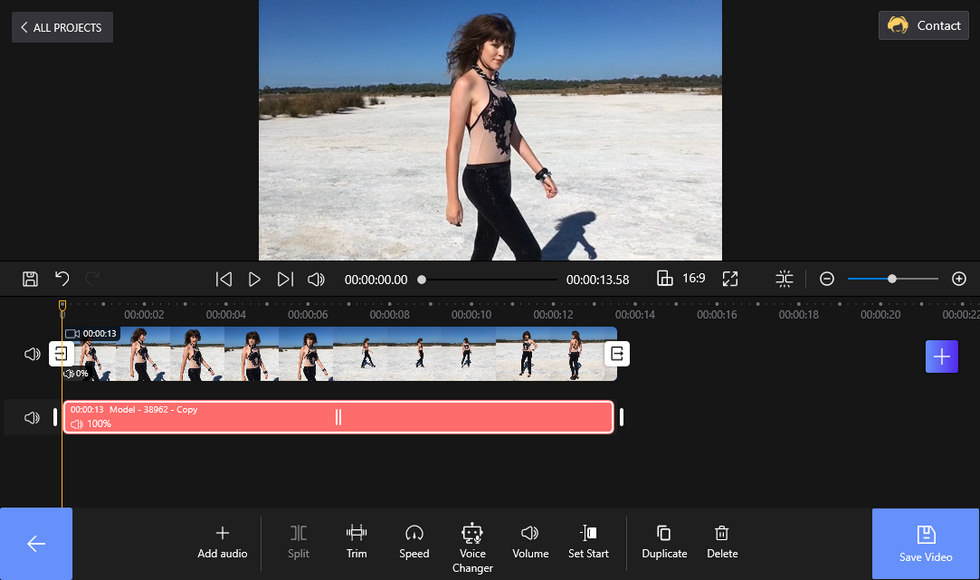
Remove Background Noise in FilmForth
Step 5. Add Background Music to Video
Now the noise in your video has been removed, yet your video doesn’t have sounds yet. With no clip selected, hit the Audio tab from the panel below and then hit Add audio. Then you’ll be provided with three options to add audio to your video:
- Add an external audio file
- Add music from FilmForth’s inbuilt music library
- Add your own voiceover to video
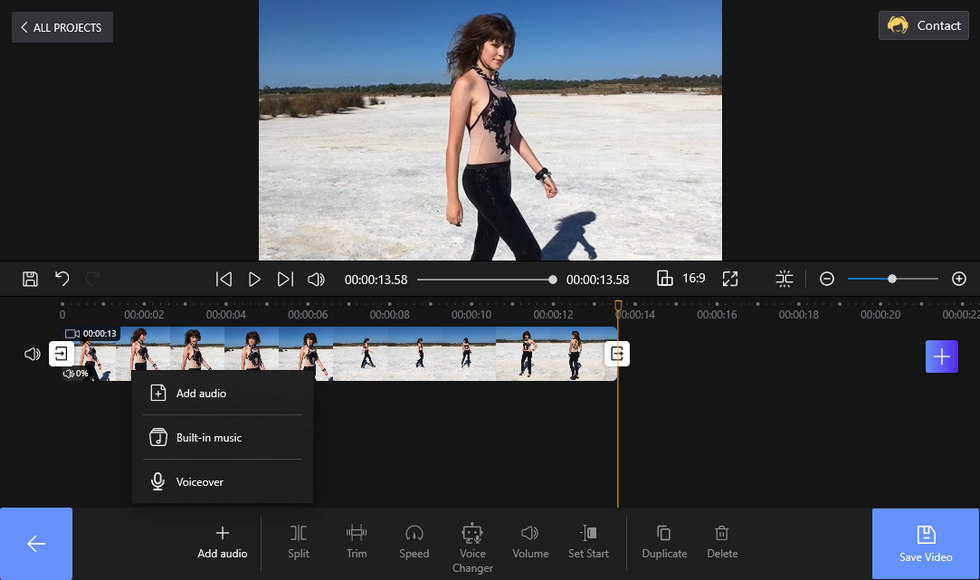
Add Background Audio to Video in FilmForth
How to Remove Background Noise from Videos Using Audacity
Aside from deleting the entire audio track using an audio remover, you can also try the free, open-source, and professional audio editing software Audacity. Audacity has a full set of audio-related features such as noise removal and audio recording.
With a feature called Noise Reduction in Audacity, you can easily reduce or even remove constant background sounds such as hum, whistle, whine, buzz, and “hiss”, while keeping the voice, music, or other wanted sounds intact.
When the noise in your videos isn’t too loud or variable, then you should give Audacity a shot.
Step 1. Free download and install Audacity onto your computer from the official Audacity website.
Step 2. Go to the upper-right File tab, select Import, and then Audio to import the audio file with the background noise you intend to remove.
Step 3. From the top-right toolbox, hit the magnifying glass and then right-click on the audio track to zoom in.
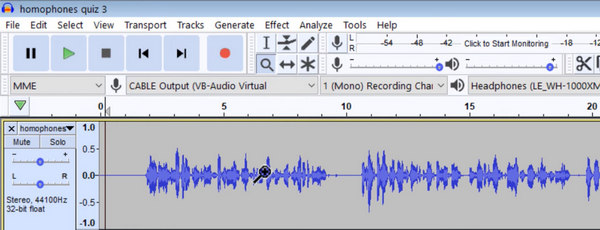
Zoom in Track on Audacity
Step 4. Go to the toolbox again and click on the Selection button that has an I-beam icon (or use shortcut F1 on the keyboard),
Step 5. Now, to find the sample of background noise, select a blank space from the beginning of the audio file where there are no waveforms.
Step 6. If you play the selected blank space, there is probably any noticeable sound coming from your audio output device, but you’ll notice the constant background noise shown from the upper-right volume bar.
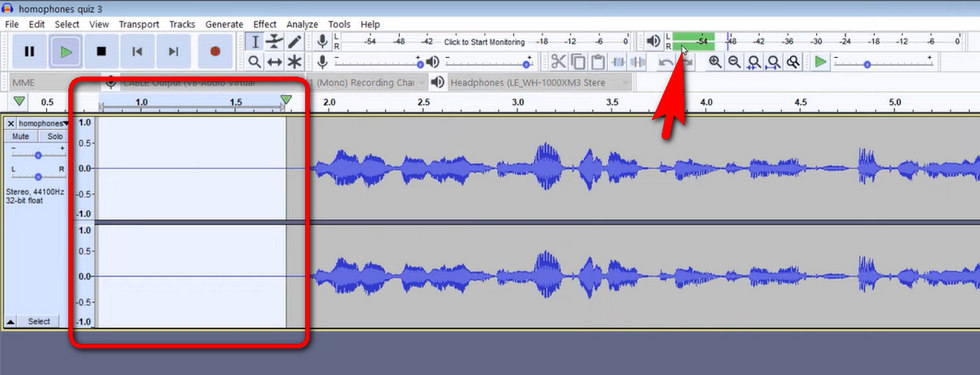
Collect Noise Sample in Audacity
Step 7. With the consistent background noise selected, go to the upper Effect tab and select Noise Reduction.
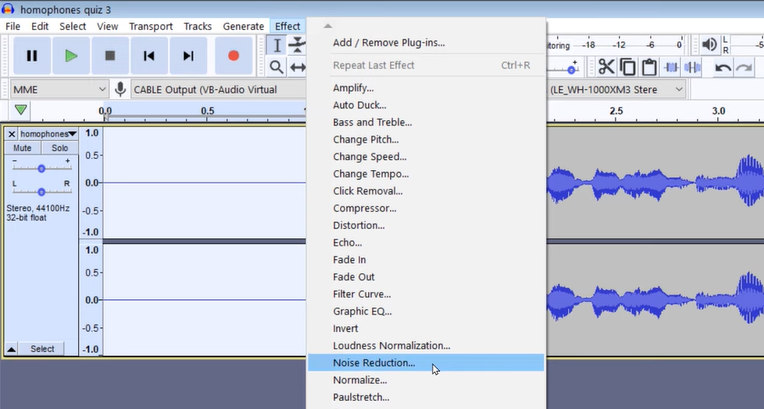
Noise Reduction in Audacity
Step 8. From the pop-up Noise Reduction window, hit the Get Noise Profile button and select the background noise sample we’ve just collected.
Step 9. Use the shortcut Ctrl + A on your keyboard to apply the noise filter to the entire audio file.
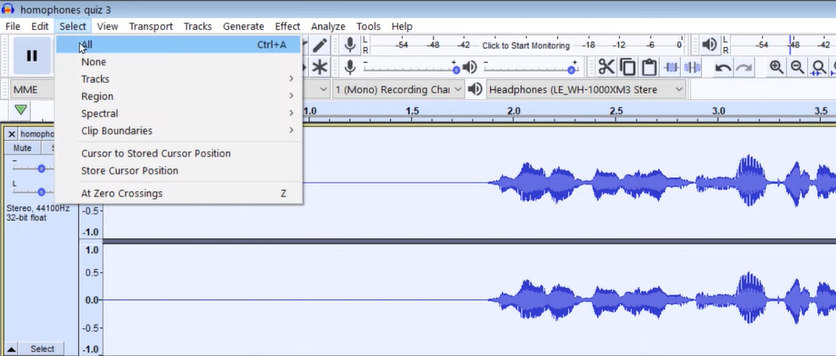
Select the Entire Audio Track in Audacity
Step 10. Manually adjust Noise Reduction level, Sensitivity, and Frequency smoothly. Then hit OK to start removing background noise in your video.
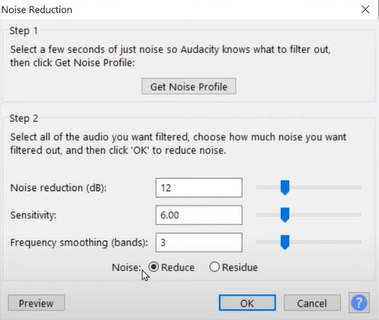
Noise Reduction Menu in Audacity
How to Remove Background Noise from Videos Using Veed
Using an online video background noise remover is a handy option if you look for no software installation. Online noise remover services are web-based tools for you to remove background noise from videos online, within a web browser application.
Online background noise removers work best if you have a device in good internet condition, and you intend to deal with small-sized files so there won’t be too much processing time or uploading/downloading issues.
We have tested several online noise removers, and the website veed.io turned out to be a better option. Veed.io is an online video editor tool with a practical video background noise removal feature, so we’ll use it to remove audio noise from videos in the following tutorial.
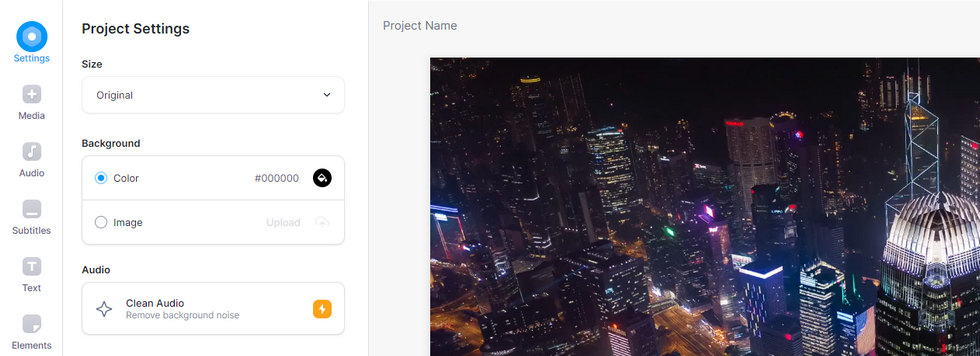
Remove Video Background Noise in Veed
Step 1. Veed works on both computers and mobile phones. Use a web browser application on your device and navigate to the Veed Background Noise Remover.
Step 2. Click the Choose Video button to upload the video with the noise you want to remove.
Step 3. Click on Settings tab to the left, and then hit the Clean Audio button, which helps to remove background noises in the uploaded video.
Step 4. Lastly hit the upper-right Export button, customize the export settings, and export the video.
*Please note that background noise removal is a paid feature in Veed.io. It costs from $12 to $59/mo. per user monthly.
How to Completely Remove Background Noise in Video?
The most ideal scenario is completely filtering out noises from videos without affecting the voices or music you want to keep in the original audio, using a professional audio processing program such as Audacity.
However, different types of sounds are always mixed together so it’s hard to achieve the abovementioned result. The best thing we can do is to reduce the noise in your videos.
According to my personal experience, the most effective way of erasing background noises from videos completely is deleting the entire soundtrack and adding a noise-free one, or recording the footage without noise in the first place – yet sadly we can’t rewind.
How Do I Remove the Sound from a Video but Keep the Voice?
To remove sounds and noises from videos while keeping the voice, you need a professional audio editor such as Audacity. As mentioned, it’s hard to completely remove certain sounds and noises, but there is a way to significantly reduced the background noise in videos, which is already provided in the second tutorial in this post.
The Concluding Thoughts
Background noises in your videos are quite a bummer and this page is here to help you fix it. With the 3 introduced methods above, I believe there’s at least one that works for your case.
So does this page help? I hope so. If you still have questions about removing background noise in videos, leave me a message in the comment section below.
Related Articles
FilmForth - Free Video Editor
- Easy to use and no skill required at all.
- Export video to MP3 with one click.
- Add transitions, effects, filter, text to the video as you want.
- Remove, replace, record and edit the background audio easily.
- Change the speed, volume, and subtitle on video with ease.
- Stabilize, trim, rotate, and convert video in seconds.


