How to Add Pointer Effect to Recording on Windows and Mac
On both Windows and Mac, this article explains how to add pointer effects to your recording. To make your video more appealing, read this post for simple ways to add cursor effects.
When giving a complex speech, it is necessary to draw the audience’s attention to key points. Therefore, a good screen recording software needs to override the pointer function. Highlighted pointers allow viewers to track the cursor’s movement across the screen, and additional pointer effects will also make your videos come alive.
If you’re looking for how to add pointer effects to your recordings, you’ve come to the right place. This article shows you how to add pointer effects to recordings on Windows and Mac respectively. Now, let’s delve into it together.
How to Use Pointer Effect on Windows
RecForth is a free screen recording software without any hidden charges that supports you to use pointer effects when recording your screen on Windows. This tool allows users to customize the color and size of the pointer, in such a way that the user can track the movement of the cursor on the screen. Next, you will learn the detailed steps on how to use RecForth to add the pointer effect to the recording.
Step 1. Download and Install RecForth
For your safety, please download RecForth directly from the Microsoft Store or the IoForth website. After the download is complete, wait a few minutes for it to install on your computer. Find the software, and double-click to enter the main interface.
 This screen recording tool provides three recording modes (full-screen recording, partial area recording, and specific window recording), and users can choose the appropriate recording mode according to their needs. After selecting the recording mode, click the Pointer icon in the toolbar at the bottom of the main interface to turn the pointer on or off. If you want to set more pointers, please enter the Setting interface to customize.
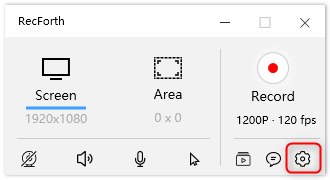
RecForth Setting Button
Step 2. Configure the Highlight Pointer
After clicking the button that turns on the capture pointer, you can start setting up the highlighted pointer.
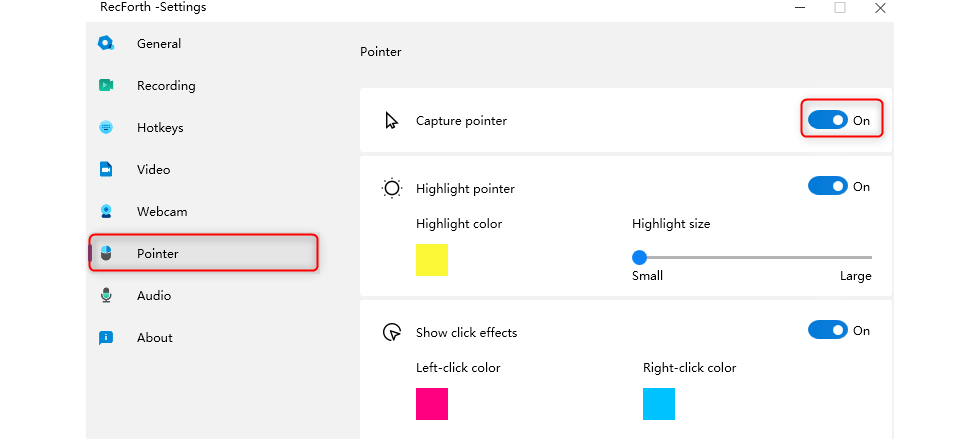
Open Capture Pointer
Click on the color block to choose the color of the pointer, this tool provides users with 32 basic colors. Immediately afterward, you can select the size of the highlight when you come, and you can adjust the size of the cursor by pulling the progress bar. Move to the left to make it smaller, and move to the right to make it larger. Special cursors can help you highlight important content while recording your screen, thereby grabbing the audience’s attention.
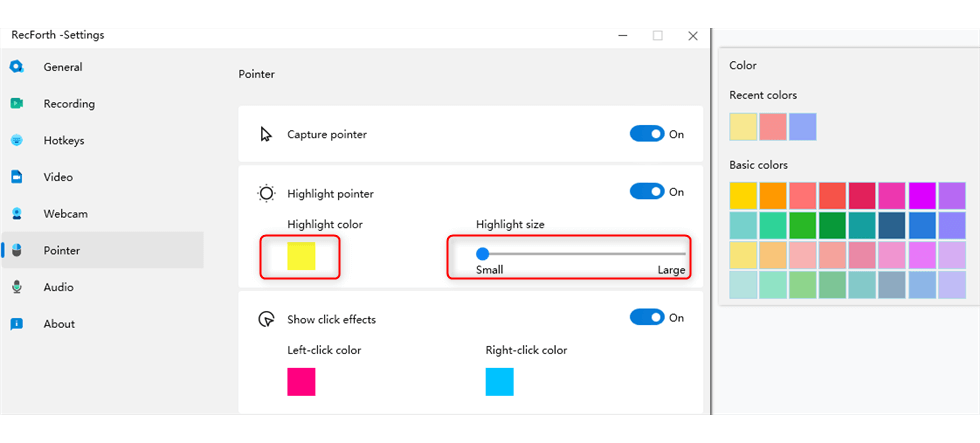
Customize Highlight Pointer
Step 3. Customize the Click Effect
This screen recording software also provides additional options that allow users to set click effects. Click to customize the left and right-click effects, the color library provides users with 32 basic colors. Different left and right-click effects can help users to better distinguish between different presentations.

Preset Click Effect
How to Use Cursor Effect on Mac
DemoCreator allows you to add a variety of special effects to videos, cursor effects, for instance. And it can be easily implemented with the DemoCreator intuitive interface. However, this feature doesn’t apply to exterior files, meaning you can only add a cursor effect to DemoCreator recorded videos.
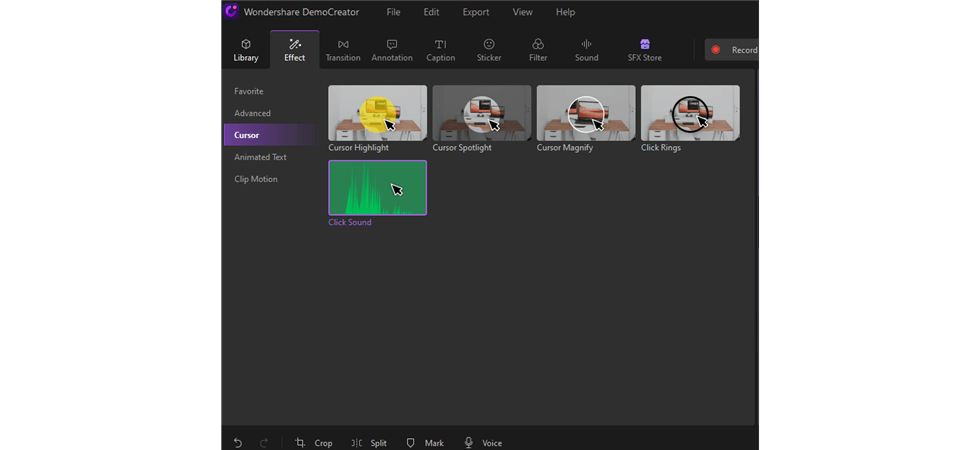
DemoCreator Cursor Effect
In the following, you’ll learn the simple steps to add cursor effect to DemoCreator recorded videos.
Step 1. Launch Wondershare DemoCreator on your computer, select the Video Editor section from the Demo Creator home screen
Step 2. If you have an already recorded video, add it to the DemoCreator timeline, record a video otherwise.
Step 3. For the toolbar tab which you can find from the upper screen, select the Cursor Effects to the left, and drag and drop it to the timeline.
Step 4. You are allowed to use multiple cursor effects at the same time. Go to the properties window so you can customize cursor settings, delete one, or pair one with another.
Step 5. Drag to move the scale slider to calibrate the positioning and opacity of your cursor effect. The highlight and spotlight colors in the menus are also allowed to change.
If you don’t like and would like to remove an added cursor effect, first click to select it from the timeline, and the Cursor settings window will pop up. Tap the “X” button to delete the added cursor effect.
Frequently Asked Questions
How Do I Make My Mouse Cursor Click effect?
For users of RecForth, setting the cursor click effect is simple. Just go to the settings page before recording starts and customize the pointer effect. Users can set the color and size of the capture pointer, and can also set different left and right-click effects.
How do I Get Rid of the Cursor Effect?
How to remove the cursor effect depends on the screen recorder you are using. Generally, just click to turn off the cursor effect before recording starts. If you are using RecForth to record the computer screen, please click the Pointer icon in the bottom toolbar and turn off the pointer effect with one click. After you close the pointer, there will be no effects on your cursor during recording.
How Do I Change the Cursor Effect?
If you want to change the cursor effect, just find the corresponding cursor settings on your screen recorder and customize it according to your needs. Changing the cursor effect is easy when using RecForth to record the screen. After entering the Setting page, click Pointer in the tab. Then you can change the color and size of the pointer, as well as change the click effect of the pointer.
Conclusion
The above content introduces how to add cursor effects to recordings on Windows and Mac, and the methods mentioned are all simple and effective. The pointer effect provided by RecForth is relatively simple, but it can also meet the basic recording needs of users and is more suitable for daily recording.
In contrast, DemoCreator’s cursor effects are more abundant. Added cursor spotlight, cursor magnify and click sound effects to the cursor highlight effect, which is more suitable for professional recording.
More Related Articles
Related Articles
RecForth - Free full-featured screen recorder for all
- Free and easy-to-use
- One-click to exported videos without watermark
- Customized the size and color of the pointer to highlight important content
- Allowing webcam overlay to capture the action
- Record system sound and voiceover
- Free set up automatic stop recording


