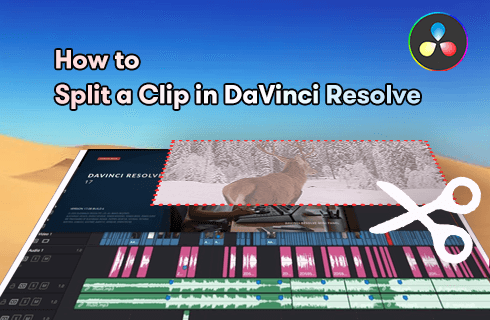
How to Split a Clip in DaVinci Resolve 18 & 17 [Complete Guide]
On this page, you can learn from the step-by-step tutorial on how to split a clip in DaVinci Resolve. The method has been tested on DaVinci Resolve 18 and 17.
Table of Content:
- What is Clip Splitting in DaVinci Resolve
- Step-by-Step Guide on How to Split a Clip in DaVinci Resolve
- How to Split Audio from Video Clip in DaVinci Resolve
- How to Split Audio Track in DaVinci Resolve
- How to Split Clip into Even Parts in DaVinci Resolve
- What’s the DaVinci Resolve 18 Split Clip Shortcut?
- How to Split-screen in DaVinci Resolve?
- How to Split a Clip Using DaVinci Resolve Alternative
How to Split a Clip in DaVinci Resolve
Content creation these days is highly correlated to video editing software, and when talking about a better video editor, DaVinci Resolve is undoubtedly an option we’d take into account. Whether you’re a video editing professional, a more followed YouTuber, or a promotion video maker, you can certainly draw support from the extensive features that DaVinci Resolve has to offer.
Today in this post, we’ll talk about basic video editing using DaVinci Resolve – how to split a clip in DaVinci resolve. From the step-by-step and illustrated instructions, I believe you can master this skill straight away.
The method to split a clip works with DaVinci Resolve 18, 17, and most previous versions. Now follow the tutorials below to get started!
Do Not Miss: 20 Best Video Editing Apps, 16 Best Intro Maker Apps, 22 Online Video Editors
What is Clip Splitting in DaVinci Resolve
DaVinci Resolve is a popular video editing program, and one of the best free video editing applications on Mac and Windows, used by millions of video editing buffs and professional video editors.
DaVinci Resolve offers ample professional video editing features without cost, and clip splitting we’ll discuss today is one of its many well-used features. If you have a prolonged video clip and you intend to remove certain unwanted portions, the Clip Splitting feature in Resolve will help you easily trim down the video clip.
The tutorial below shows the detailed steps to split one or more clips in DaVinci Resolve.
And in the latter section of this post, we’ll also talk about how to split an audio track, and how to detach audio tracks from a video clip in DaVinci Resolve.
Related Info: You learn more about DaVinci Resolve from our DaVinci Resolve review.
Step-by-Step Guide on How to Split a Clip in DaVinci Resolve
Step 1. Load Clip in DaVinci Resolve
Launch DaVinci Resolve on your computer. Go to the File tab and hit Import File from the dropdown, and then hit Import Media to add the clip you into split into DaVinci Resolve.
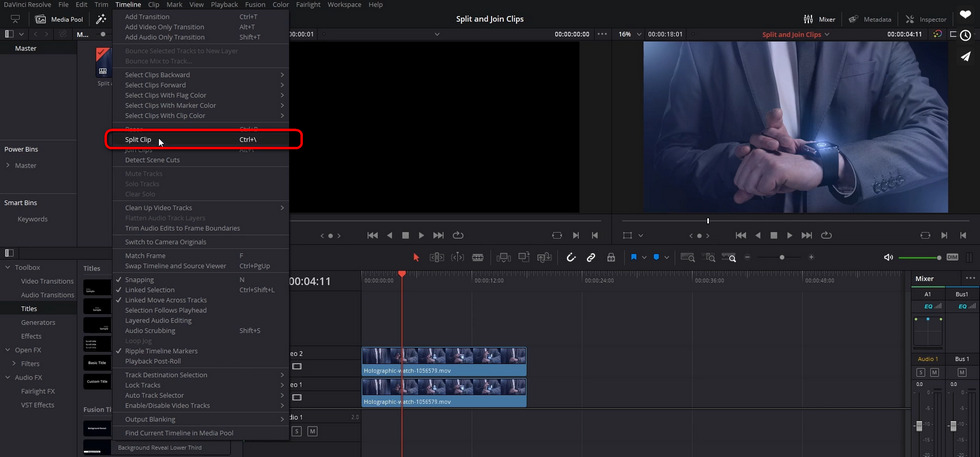
Step 2. Split the Clip to Timeline
Drag and drop the playhead in the timeline to define where you intend to split the added video clip. Then you can use the keyboard shortcut Ctrl + \ to split the clip.
You can also use keyboard shortcut Ctrl + B to open the blade tool, with which you can split the added clip in a likewise manner.
Step 3. Export the Split Clips
When the added clip is successfully split, you can conduct further editing or rejoin the split clips. Delete the unwanted split in the timeline, and go to Delivery Tab > Render Settings to save and export the split video clip. If you want both split clips, do it again for another split.
Split Video in DaVinci Resolve
How to Split Audio from Video Clip in DaVinci Resolve
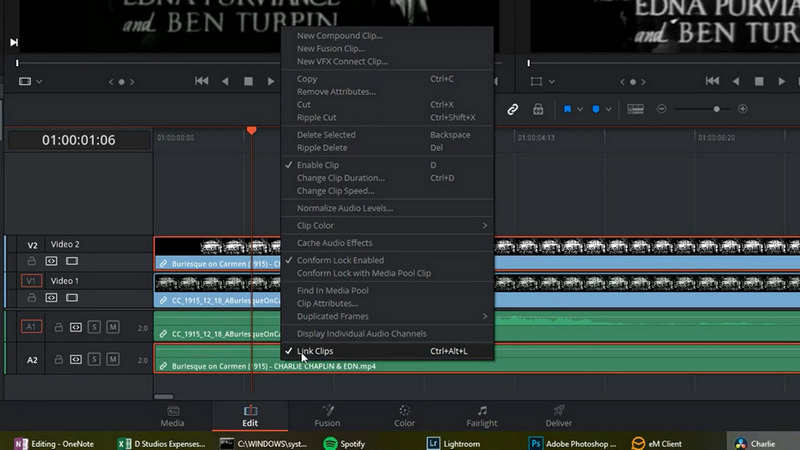
Looking for solutions to splitting audio from clips? In this part, you’ll learn how to detach audio from video clips in DaVinci Resolve, so you can either remove/replace the audio track, or edit the video and audio tracks separately.
To detach the audio track from a video clip in DaVinci Resolve 18, you can simply hit the chain link in the toolbar above. Additionally, you can also use keyboard shortcut Ctrl + Shift + I to unlink audio and video tracks for the clip in the timeline, so as to edit or delete the detached audio track separately.
More DaVinci Resolve Tips: How to Fix DaVinci Resolve Laggy, How to Export DaVinci Resolve
Unlink Audio from Video in DaVinci Resolve
How to Split Audio Track in DaVinci Resolve
And if you’re looking for the methods to split a long audio track into several parts, you can find the effective method in this part.
To split an audio track in DaVinci Resolve, it’s just like what we did with a video clip.
There are two ways to split an audio track DaVinci Resolve:
- For the added video clip, select both audio and video tracks in the timeline, with the track selector turned on, and then use the Split shortcut Ctrl + \, which will split the video and audio tracks simultaneously.
- Follow the tutorial in the previous part of the post to first detach the audio track, so you can respectively split video and audio tracks.

Split Audio in DaVinci Resolve
How to Split Clip into Even Parts in DaVinci Resolve
To split clip into even parts in DaVinci Resolve, the easier method is using the reoccuring clipping, type +2… (3 periods) Enter to jump ahead in the timeliner, then Ctrl+\ to split the added clip, and then repeat.
What’s the DaVinci Resolve 18 Split Clip Shortcut?
In DaVinci Resolve 18 and DaVinci Resolve 17, the keyboard shortcuts Ctrl + B Razor tool and Ctrl + \ split tool used to split a clip in the timeline quickly.
How to Split-screen in DaVinci Resolve?
To split video screen in DaVinci Resolve, you can use the split-screen video filter. Go to the Effects Library and Open FX. From Fx Filters, choose Resolve FX Transform, and then Video Collage within. Apply the Video Collage effect for the added clip so you can get a split-screen video in DaVinci Resolve.
Related: Learn about the 15 best split-screen video editors.
How to Split a Clip Using DaVinci Resolve Alternative
If you’re a beginner in the field of video editing, the functionalities and features that DaVinci Resolve offers could be a bit excessive. Looking for an easier DaVinci Resolve alternative to split your video clips real quick? We got you covered.
Meet FilmForth, the best free DaVinci Resolve alternative for Windows, one of the best free video editing software in 2022.
It’s pretty easy, splitting clips using FilmForth, which can be done in 5 simple steps.
- Launch FilmForth on your PC, and hit the New Project button.
- Drag and drop the clip you intend to split into FilmForth
- Head to the Edit tab from the operational panel below
- Move the playhead in the timeline to the desired position and hit Split, then remove an unwanted clip.
- Hit the Save Video button to save and export one of the split clips.
Apart from video splitting, you can merge, resize, adjust speed, add transitions to, add special effects to, etc. your videos with FilmForth with ease!

Split the Video Clip on FilmForth
The Conclusion
Since DaVinci Resolve is such a versatile video editing program, the method introduced in the post is not the only method to split video clips in DaVinci Resolve, such as using keyboard shortcuts, Blade Edit Mode, etc.
So how would you go about the clip splitting in DaVinci Resolve? Leave a message in the comment section below to share with us your insights and your unique video editing workflow! We’d love to hear from you.
Moreover, don’t forget to give the recommended DaVinci Resolve alternative a try, especially if you are not so familiar with these video edit stuffs!
More Related Articles
- 16 Best Video Editing Software for Mac: Free and Paid
- 12 Best Face Swap Apps to Add Some Fun to Your Photos
- Top 18 Slow Motion Video Editors to Slow Down the World
- The Complete Guide on How to Make a Smooth Video Slow Motion
- 15 Best Split-Screen Video Editors for Professionals and Beginners
- Top 24 PC Games Download Websites [Updated]

Karen is a professional writer with a background in column writing who enjoys resolving complex topics and explaining them in interesting ways.
Related Articles
FilmForth - Free Video Editor
- Easy to use and no skill required at all.
- Export video to MP3 with one click.
- Add transitions, effects, filter, text to the video as you want.
- Remove, replace, record and edit the background audio easily.
- Change the speed, volume, and subtitle on video with ease.
- Stabilize, trim, rotate, and convert video in seconds.