How to Export in DaVinci Resolve 17 to ProRes, MP4, Premiere, YouTube, and More in 2023
This page is the complete guide on how to export DaVinci Resolve to professional or compatible video formats like ProRes or MP4, how to export DaVinci Resolve to video-sharing websites like YouTube, and how to export DaVinci Resolve to other video editings like Premiere Pro. The location for finding the Resolve export files is also introduced.
Once done editing in DaVinci Resolve, it’s time to export your project to compatible video formats and video-sharing platforms like YouTube and TikTok. You may wonder, however, in front of the complicated Resolve interface, how to download video from Davinci Resolve once you’ve finished the editing work?
If you have no idea how to do so, no worries, this guide will definitely save your skin. With the step-by-step tutorials, this guide will show you how to export DaVinci Resolve, how to export DaVinci Resolve to ProRes, MP4, MOV, AVI, etc., how to export DaVinci Resolve to Premiere Pro, and where to find the DaVinci Resolve export files.
More Popular Posts: 22 Best Online Video Editors, 16 Best Intro Maker Apps/Software, Top 18 Slow Motion Video Editors
Content Table
Things You Should Know Before Exporting DaVinci Resolve 17
Before exporting projects from DaVinci Resolve, you have to make sure you’ve completed the editing works. When exporting DaVinci Resolve 17, you can either export an editing project in the program or export Resolve project DRP to MP4, MOV, ProRes, etc. files.
There are two main ways of exporting DaVinci Resolve, one is using DaVinci Resolve presets, and the other is manual exporting.
If you opt for manual exporting. the entire exporting process DaVinci Resolve includes customization, configuration, transcoding, and rendering, which can be pretty perplexing for video editing beginners. To help you get a clue. in the tutorial below, I’ll walk you through the whole process in 5 simple steps.
Related Posts: How to Export Filmora 11 to MP4, How to Export Premiere Pro to MP4
How to Export DaVinci Resolve 17 to ProRes, MP4, Quick Time, etc.
Step 1. Load Project in DaVinci Resolve
To render and export DaVinci Resolves, let’s start with launching DaVinci Resolve and importing your finished video editing project. You can continue the editing in the workplace if needed.
Step 2. Go to Delivery Tab
Hit the Deliver button from the lower control panel to enter the Deliver screen, that’s where you can edit video parameters and render your video.
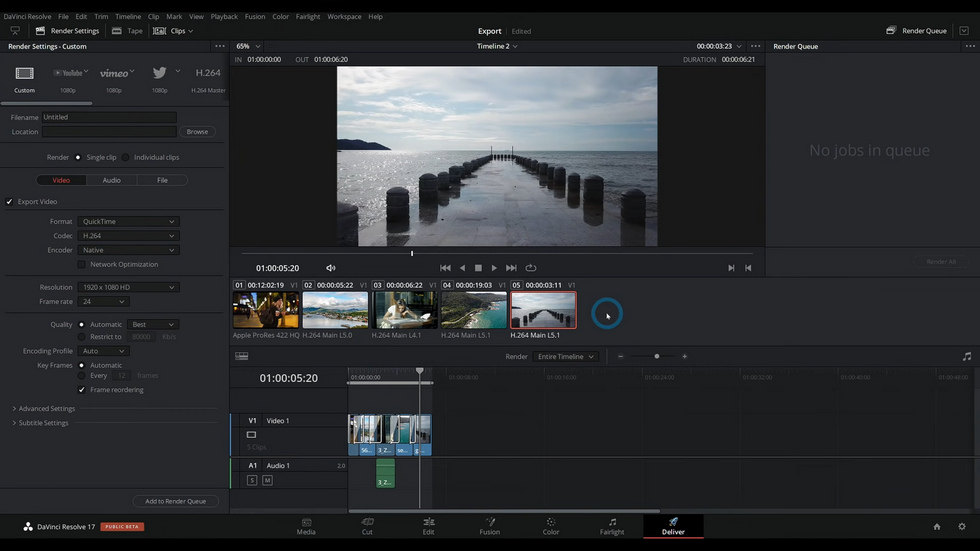
Go to Resolve Deliver Screen
Step 3. Go to Render Settings
From the Deliver screen, head to the upper-left section for video render settings. As you can see, DaVinci Resolve offers many presets including YouTube, Vimeo, Twitter, etc.
Go under the Custom tab, where you can change the video format, codec, frame rate, etc. as you need.
For example, to export DaVinci Resolve to MP4, we advise you to change the Format to H.264 MP4 or H.265 MP4, which are ideal for web sharing.
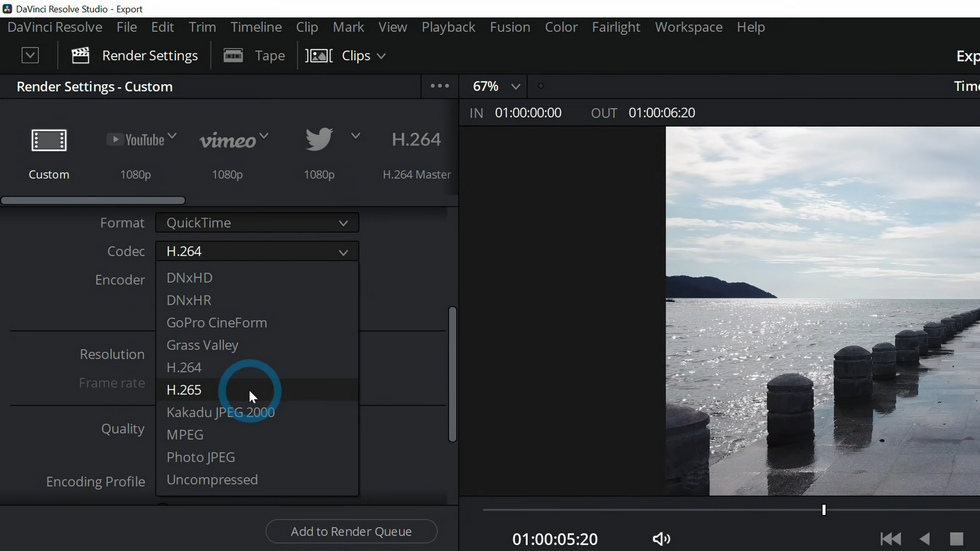
Go to Resolve Render Settings
Step 4. Adjust Video Quality
Next, scroll down from the Render Settings section in the Deliver screen, and you’ll see options for adjusting video quality. For best sharing results on YouTube, Twitter, Facebook, and TikTok, here we recommend 1920*1080 resolution and 30000 Kbps video quality.
And set the Frame rate between 23.976 to 60 as it’s the best frame rate for YouTube.
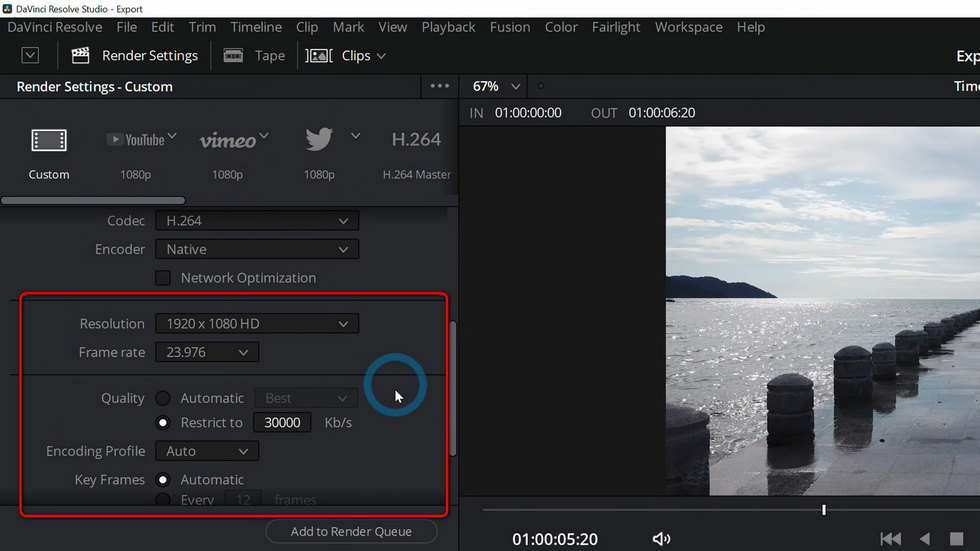
Resolve Adjust Video Quality
Step 5. Save and Export DaVinci Resolve 17
When parameter adjustments are done, scroll further in the render section and you’ll see the export settings. Hit the Browse button to define the destination path of your Resolve exports, and give your export file a file name in the Filename box. Lastly, hit Save and your video shall be exported in seconds.
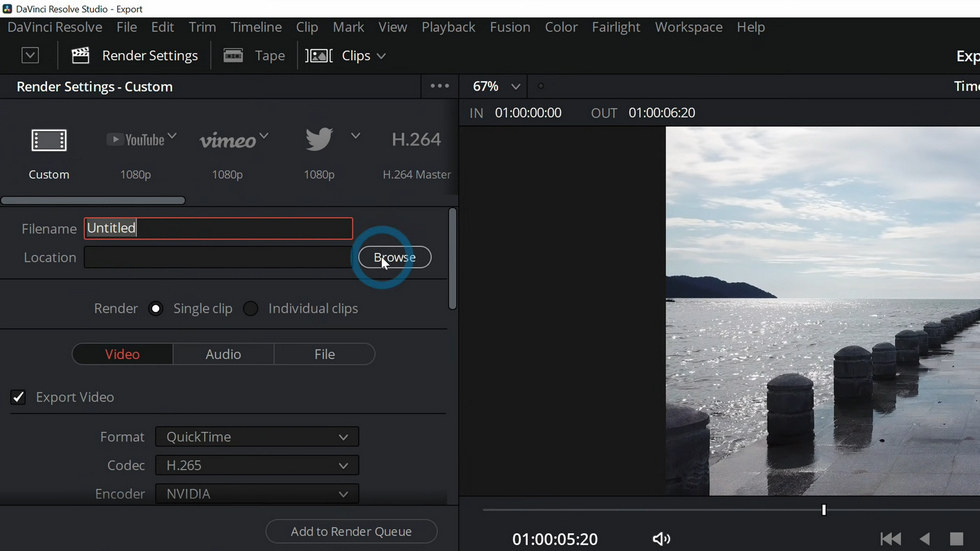
Save and Export from Resolve
How to Export DaVinci Resolve 17 to YouTube
To Export DaVinci Resolve, we can use the DaVinci Resolve Quick Export option which has ready-made settings for YouTube uploading & sharing.
- Launch DaVinci Resolve and load the project you intend to export to YouTube.
- Go to the File tab from the upper-left side.
- Click on the Quick Export… option.
- From the pop-up Window, select YouTube with the YouTube icon. The H.264 and H.265 options are of the YouTube video specification as well.
- And then you can check the Upload directly to the YouTube box to upload the editing project and timeline in DaVinci Resolve to YouTube (sign-in needed), or hit the Export button to get the local video file.
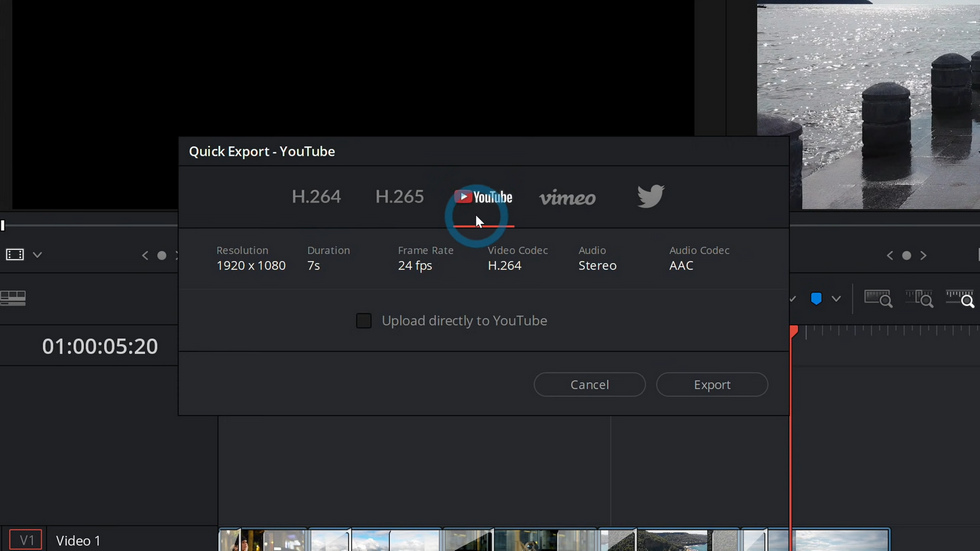
Resolve YouTube Preset
How to Export DaVinci Resolve 17 to Premiere Pro
Premiere Pro and DaVinci Resolve are both powerful and practical video editing software, and many professional video editors use them both when creating fabulous video content. Thus sometimes we need to export the DaVinci Resolve project or timeline into Premiere Pro for further editing.
The tutorials below show you how to export DaVinci Resolve to Premiere Pro. For details on exporting DaVinci Resolve to Final Cut Pro, check PremiumBeat’s guide.
- Load your project in DaVinci Resolve, go to the File tab, and then Export AAF, XML.
- a new window will pop up for your to rename and save the file in the preferred XML format. We recommend FCP XML 1.3 for the best exporting result.
- To export, DaVinci Resolve to Premiere Pro, the paid installation of Project X27 is a must. Make sure you have installed it on Premiere Pro to move on.
- Open the XML file we just created, right-click on it, and select Project X27.
- Attribute all your editing in the pop-up menu, and hit OK to save the new XML.
- Finally, import the new XML to Premiere Pro to get all your Resolve edits and timeline in Premiere Pro.

Export Resolve to Premiere
Where to Find DaVinci Resolve 17 Export
Where to find Resolve export files? You can find your DaVinci Resolve 17 export from the destination path you defined.
And if you forgot to define it, you can easily find your DaVinci Resolve export video from the following default export locations, but please note that the DaVinci Resolve export file location is different from that of its project files DRP(.drp).
- DaVinci Resolve export file location:
DaVinci Resolve Export Location on Windows: C:/Users/<your user name>/AppData/Roaming/BlackMagic Design/DaVinci Resolve/Support/Resolve Disk Database.
DaVinci Resolve Export Location on Mac: Macintosh HD/Library/Application Support/Blackmagic Design/DaVinci Resolve/Resolve Disk Database
To Sum Up
With the tutorials above, it becomes easier and faster to export DaVinci Resolve editing projects to video formats like MP4, social media platforms like YouTube, and other pieces of video editing software.
Though it may seem quite difficult and confusing in the beginning, I believe it’s much easier once you finished following this guide. Anyways, now it’s time for you to launch your DaVinci Resolve, follow this guide, and export your most proud creation! Let’s see how it blows your friends’ minds.
More Related Articles

Karen is a professional writer with a background in column writing who enjoys resolving complex topics and explaining them in interesting ways.
Related Articles
FilmForth - Free Video Editor
- Easy to use and no skill required at all.
- Export video to MP3 with one click.
- Add transitions, effects, filter, text to the video as you want.
- Remove, replace, record and edit the background audio easily.
- Change the speed, volume, and subtitle on video with ease.
- Stabilize, trim, rotate, and convert video in seconds.